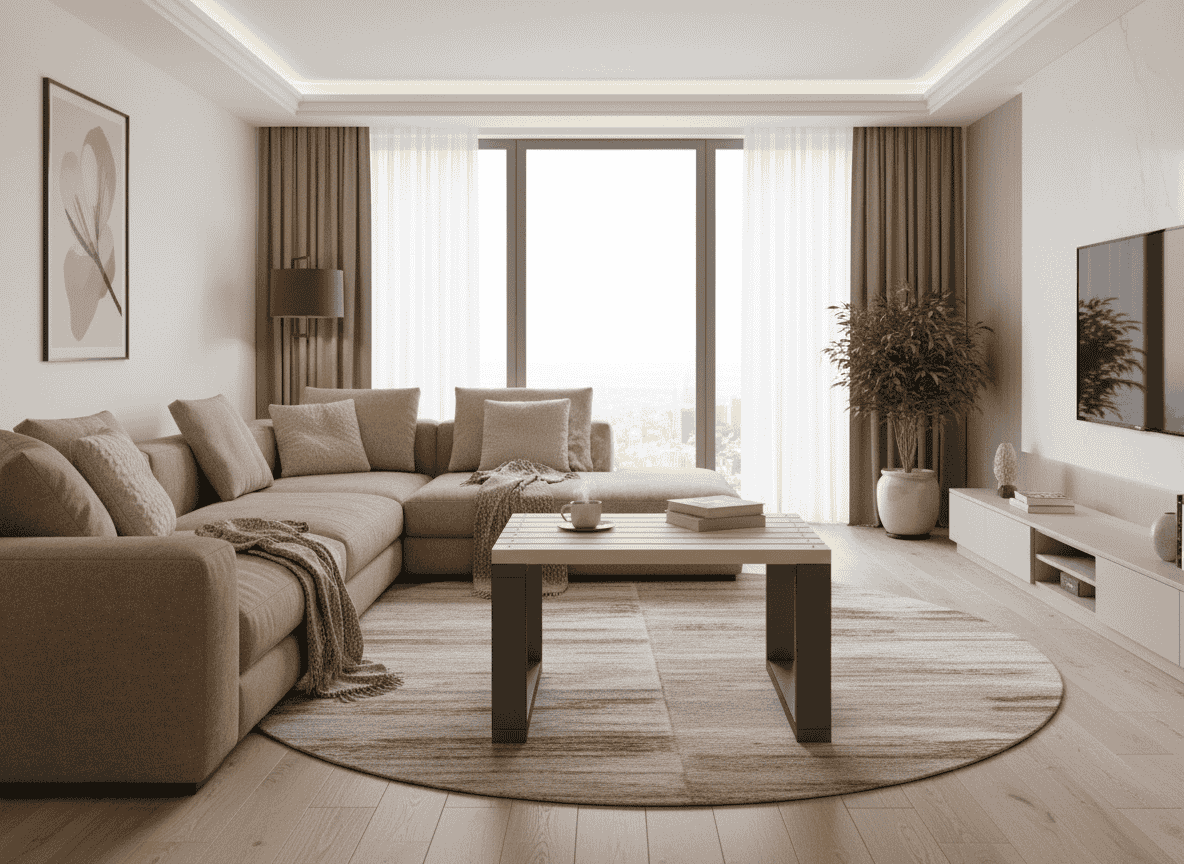
This DIY coffee table project pairs a slatted solid-wood top with two sturdy rectangular leg frames built entirely from standard 2×4 lumber. The result is a clean, modern piece that fits equally well in a Scandinavian or industrial-style living room — and you can build it in a single weekend with basic tools. Below you’ll find a full materials list, step-by-step assembly instructions, and photos for every stage.
📋 Materials List
🪵 Right Leg Assembly
- ✅ 2″ × 4″ Lumber 27″ × 2
- ✅ 2″ × 4″ Lumber 16″ × 2
- ✅ #14 4″ Flat Head Wood Screw × 4
🪵 Left Leg Assembly
- ✅ 2″ × 4″ Lumber 27″ × 2
- ✅ 2″ × 4″ Lumber 16″ × 2
- ✅ #14 4″ Flat Head Wood Screw × 4
🪵 Tabletop & Final Assembly
- ✅ 2″ × 4″ Lumber 34″ × 7
- ✅ #10 3″ Flat Head Wood Screw × 14
🔍 Phase 1 – Group Overview
Before assembly begins, familiarise yourself with the three main components: the Right Leg Assembly, the Left Leg Assembly, and the Tabletop planks. Each leg is built as a self-contained rectangular frame, then both frames are stood upright and the tabletop planks are laid across them.
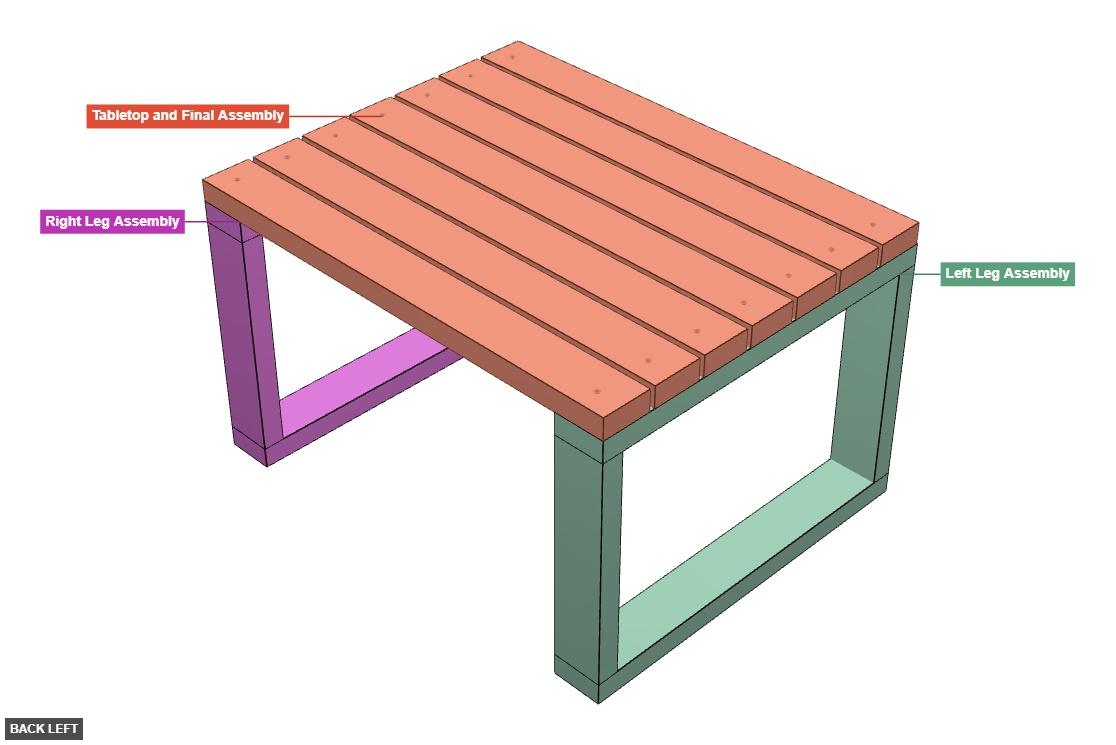

1. Build the Right Leg →
2. Build the Left Leg →
3. Attach the Tabletop planks
🔧 Phase 2A – Right Leg Assembly
The right leg is a rectangular frame made from two horizontal rails (top and bottom, 27″ long) and two vertical supports (16″ long). Four screws — one at each corner — lock the frame together.
Parts for the Right Leg:
- P1 – Bottom rail: 2″ × 4″ × 27″
- P2 – Top rail: 2″ × 4″ × 27″
- P3 – Front vertical support: 2″ × 4″ × 16″
- P4 – Rear vertical support: 2″ × 4″ × 16″
- P5, P6, P7, P8 – #14 4″ Flat Head Wood Screws (one per corner)
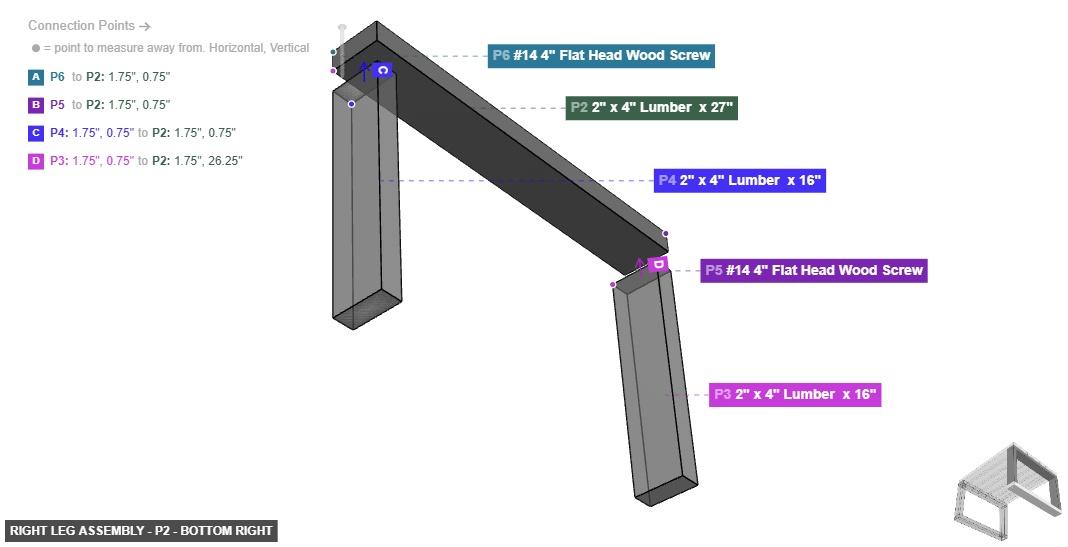
Lay the top rail P2 horizontally. The front end of P2 will be joined by screw P6, and the rear end by screw P5.
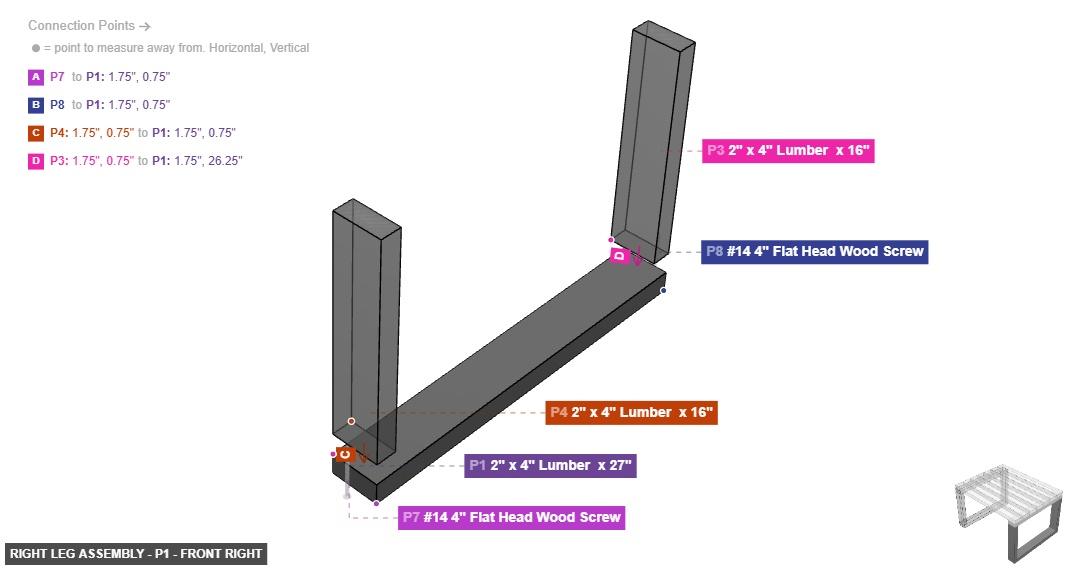
Position vertical support P3 between the top rail (P2) and the bottom rail (P1) at the front corner. The top end of P3 connects to P2, and the bottom end connects to P1.
Drive screw P5 through the rear end of top rail P2 in a bottom-facing orientation. Drive screw P6 through the front end of P2, also bottom-facing. These two screws fix the top rail to the vertical supports.
Drive screw P7 into the front end of bottom rail P1, top-facing. Drive screw P8 into the rear end of P1, also top-facing. The right leg frame is now complete.
🔧 Phase 2B – Left Leg Assembly
The left leg is assembled in exactly the same way as the right leg, mirrored. It uses the same lumber dimensions and the same screw type (parts P9–P16).
Parts for the Left Leg:
- P9 – Bottom rail: 2″ × 4″ × 27″
- P10 – Top rail: 2″ × 4″ × 27″
- P11 – Front vertical support: 2″ × 4″ × 16″
- P16 – Rear vertical support: 2″ × 4″ × 16″
- P12, P13, P14, P15 – #14 4″ Flat Head Wood Screws
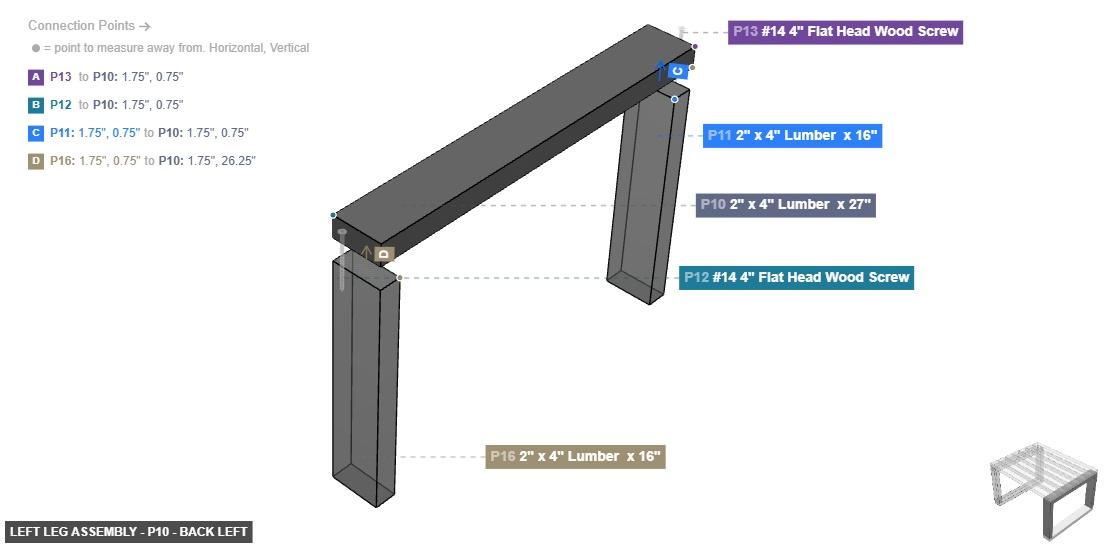

Repeat the same four steps used for the right leg: set the top rail P10, insert vertical supports P11 and P16, then fasten with screws P12 & P13 (rear corners) and P14 & P15 (front corners).
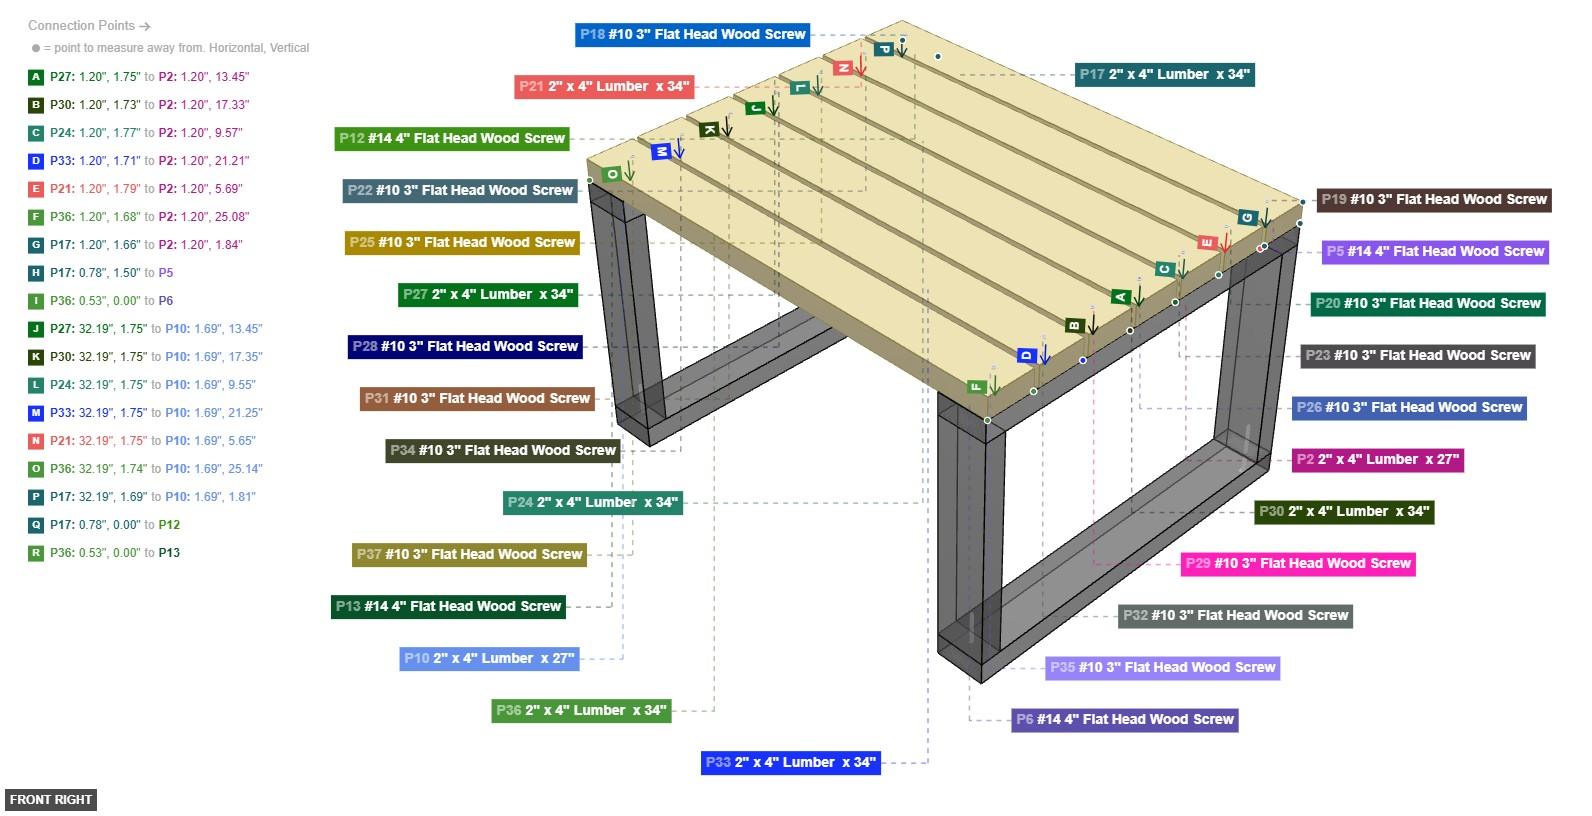
🔧 Phase 3 – Tabletop & Final Assembly
With both leg frames fully assembled, stand them upright and parallel to each other, approximately 27″ apart. Now lay the seven tabletop planks (P17–P36) across the top rails of both legs and secure each one with two screws.
Tabletop Planks (P17 – P36):
| Part | Size | Screws | Position |
|---|---|---|---|
| P17 | 2″ × 4″ × 34″ | P18, P19 | 1st plank – rear edge |
| P21 | 2″ × 4″ × 34″ | P20, P22 | 2nd plank |
| P24 | 2″ × 4″ × 34″ | P23, P25 | 3rd plank |
| P27 | 2″ × 4″ × 34″ | P26, P28 | 4th plank – centre |
| P30 | 2″ × 4″ × 34″ | P29, P31 | 5th plank |
| P33 | 2″ × 4″ × 34″ | P32, P34 | 6th plank |
| P36 | 2″ × 4″ × 34″ | P35, P37 | 7th plank – front edge |
Tabletop Assembly Steps:
- Stand both completed leg frames upright on a flat surface, parallel and ~27″ apart.
- Lay the first plank (P17) flush with the rear outer edge of both top rails.
- Confirm it is centered and square, then drive one #10 3″ screw down through each end into the top rail below.
- Insert your spacer, then continue adding planks toward the front, fastening each one before moving to the next.
- The final plank (P36) should sit flush with the front outer edge of both legs.
• Sand all surfaces and edges (120 → 220 grit) for a smooth finish
• Apply wood oil, stain, or clear lacquer to the top planks
• Paint the leg frames in matte black for an industrial look
• Add rubber feet to the bottom of each leg to protect your floor
🎉 Finished Table!
Congratulations—your coffee table is done! This project requires only basic woodworking skills and all materials are available at any home improvement store. Total build time for most beginners is 2–4 hours.
📊 Project Summary
| Difficulty: | ⭐⭐ Beginner / Intermediate |
| Build time: | 2–4 hours |
| Tools needed: | Power drill, carpenter’s square, tape measure, sander |
| Finished dimensions: | ~34″ W × 27″ D × 18″ H |
| Total parts: | 37 (lumber boards + screws) |
| Style: | Modern / Industrial / Scandinavian |
Disclosure: I may receive a commission if you purchase through the links in this post.
Looking for more woodworking projects?

More related projects:

“DIY woodworking enthusiast who started with zero experience and a YouTube tutorial.
I build simple, practical projects for my home and share free plans
so other beginners can skip the guesswork.If I can build it, you can too.”