Tired of tripping over shoes? A DIY shoe rack is one of the easiest beginner woodworking projects.
In this guide, you’ll get free plans, a complete cut list, and step-by-step instructions to build a sturdy wooden shoe rack in a single afternoon.
What You’ll Need
🪵 Materials
• 3/4″ x 4′ x 8′ Oak (or other hardwood) Plywood: Two Pieces for
the Top/Bottom, two Side Panels, and the Shelves
• 3/4″ x 1 1/2″ x 12′ Solid Oak Material: Two pieces for the Front
Frame and the two, Door Panels
• 1/4″ x 4′ x 8′ Oak Plywood: One piece for the Back Panel and Door
Panels
• Screws; 1/4 lb.
• 3/4″ Wood Screws; 1/4 lb.
• Six Hinges
• Plastic Legs
• Sandpaper
• Wood Filler and Glue
• Satin Finish Polyurethane Poly
🔧 Tools
- Circular saw or miter saw
- Drill
- Tape measure
- Pencil
- Safety glasses
💡 This project requires precise measurements and cuts.
Free DIY Shoe Rack Plans
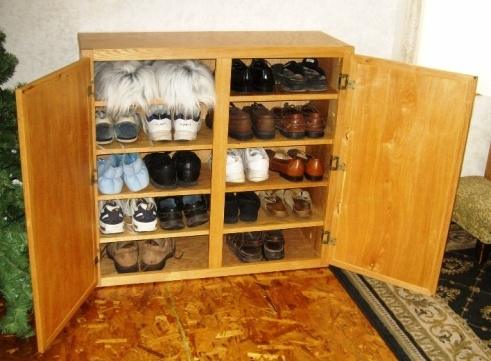
This classic 4-shelf shoe rack fits perfectly in an entryway, closet, or mudroom. It’s compact enough to slide under a console table if you want shoes mostly out of sight.
This post contains affiliate links; I may earn a commission at no extra cost to you.
Cut List
| Part | Qty | Material | Size |
|---|---|---|---|
| Top Panel | 1 | 3/4″ Oak Plywood | 14″ × 36″ |
| Bottom Panel | 1 | 3/4″ Oak Plywood | 14″ × 36″ |
| Side Panels | 2 | 3/4″ Oak Plywood | 14″ × 18″ |
| Shelves | 4 | 3/4″ Oak Plywood | 13 3/4″ × 34.5″ |
| Front Frame pieces | 1 set | 3/4″ × 1 1/2″ Solid Oak | 12′ board |
| Door Frame pieces | 2 sets | 3/4″ × 1 1/2″ Solid Oak | 12′ board |
| Back Panel | 1 | 1/4″ Oak Plywood | 36″ × 18″ |
| Door Panels | 2 | 1/4″ Oak Plywood | per door size |
Step-by-Step Instructions
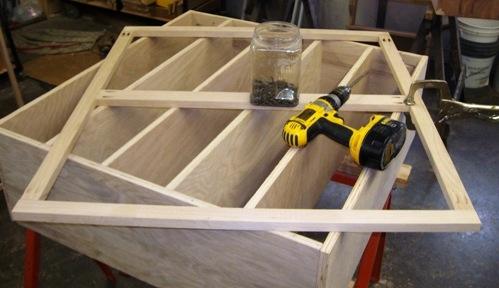
Step 1: Cut the Box and Shelf Pieces
Determine the desired size of the Shoe Rack; this rack was designed to fit in a hallway against a 3′ high knee wall (no space allowed for heavy winter boots).
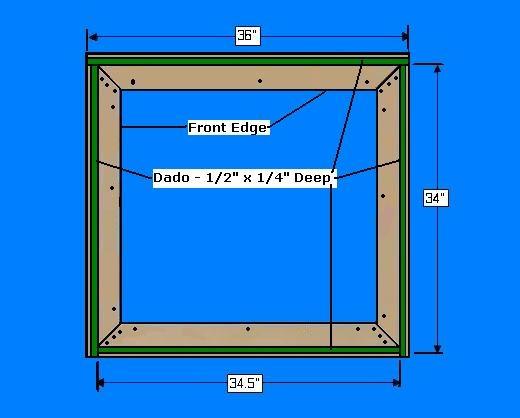
• Select the 3/4″ Plywood Panel; Rip two pieces to 14″; crosscut the Top, Bottom and two Side pieces per the dimensions listed above
• Select the Top, Bottom, and two Sides; make a 1/4″ x 1/2″ dado cut on the interior back edges of these panels to receive the Back Panel
• Select the Top, Bottom, and two Sides; drill Kreg holes on the panels as shown above to construct the box and to receive the Front Frame; Use the Kreg Pocket Hole Jig System;
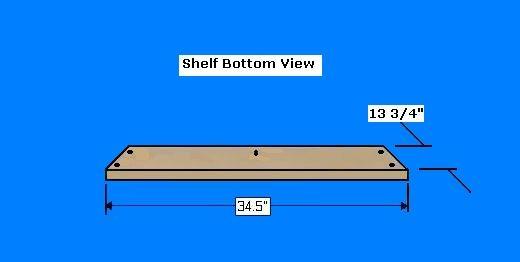
• Select the 3/4″ Plywood Panel; Rip two pieces to 13 3/4″; crosscut them to four Shelves @ 34.5″
• Select the four Shelves; drill five Kreg holes on each of the bottom sides to connect them to the Front Frame and the Left/Right Side
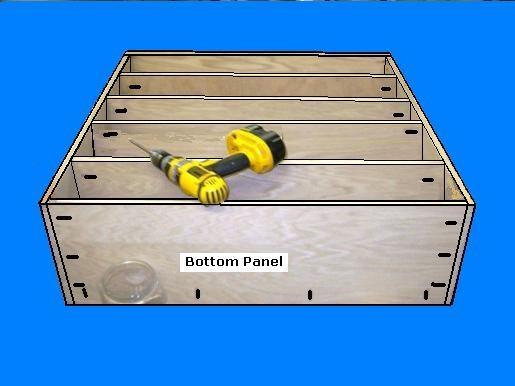
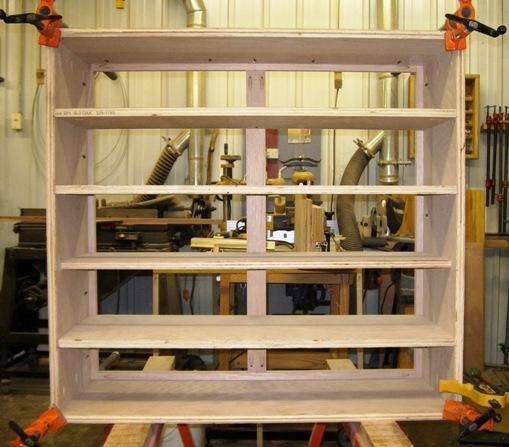
Step 2: Assemble the Box Pieces – Select the Top, Bottom, two Sides, and the four Shelves
• Select the two Sides and the Top Panels; attach the Sides to the Top Panel with Kreg screws (Note: allign the Front edges)
• Select four Shelves and cut two spacing blocks @ 5 3/4″; place the spacing blocks under the Top Panel along each side; using the Kreg screws, attach the first, Top Shelf (ensure the screws are on
the bottom)
• Select the next Shelf; using the spacing blocks and Kreg screws, attach this shelf and the remaining two Shelves
• Select the Bottom Panel and Kreg it into place
Step 3: Make and Attach the Front Frame and Back Panel – Select the 3/4″ x 1 1/2″ x 12′ Solid Oak Material and 1/4″ Plywood
• Select the 3/4″ x 1 1/2″ x 12′ Solid Oak Material, Crosscut the Front Frame pieces to the dimensions, as shown above
• Using the Kreg System, connect all Frame pieces, as shown above
• Select the Frame and attach it to the front of the Shoe Rack with Kreg screws in the previous drilled holes, as shown above
• Select the 1/4″ Plywood; measure the Back Panel space; cut the plywood to size and attach it to the back side of the rack with short screws
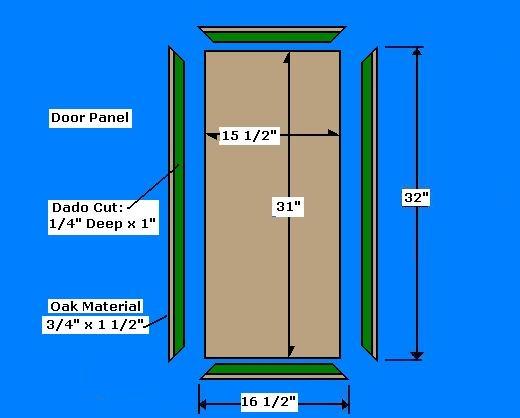

Step 4: Make and Attach the Door Panels – Select the 3/4″ x 1 1/2″ x 12′ Solid Oak Material and 1/4″ Plywood
• Select the 3/4″ x 1 1/2″ oak; crosscut @ 45 degrees, the pieces for the two doors per the dimensions above
• Set the Table Saw to rip 1/4″ depth x 1″; remove 1/4″ x 1″ material from the rear/inside edge to receive the 1/4″ Plywood Door Panel
• Select the cut pieces of the Door Frames; connect the pieces using a Corner Jig, glue, and a 1 1/2″ screw in each corner (pre-drill the screw holes)
• Select the 1/4″ Plywood; cut the two Door Panels to the dimensions listed above
• Select the two Door Frames and two Plywood Panels; place a bead of glue along the perimeter of the dado of the Door Frames; set in the plywood panel; weight it down overnight to allow the glue to set
• Select the six Hinges and attach them, as shown above
Step 5: Finish the Shoe Rack – Select the 3/4″ x 1 1/2″ oak material and the Finishing Materials
• Select the Oak Material; cut two pieces @ 3/4″ x 1/8″ x 14″; glue a piece to each end of the Plywood Top Panel to finish the plywood ends
• Use the same 1/8″ material and glue to finish the front edges of the four shelves
• Use Wood Filler for all holes
• Complete all sanding
• Apply a minimum of three coats of poly
DIY Shoe Rack Ideas and Variations
Once you’ve mastered the basic design, here are some popular variations worth trying:
🪑 Shoe Rack with Bench
Add a seat on top by extending the leg pieces to 18–20 inches and attaching a wider board across the top. Perfect for an entryway.
📏 Tall Shoe Rack (3 Shelves)
Add a third shelf level and extend the leg height to 20 inches. Fits 15–18 pairs and works great in a closet.
🏠 Small Shoe Rack (24″ Wide)
Cut shelf boards to 24 inches instead of 33 for a compact version that fits in tight spaces. Great for apartments.
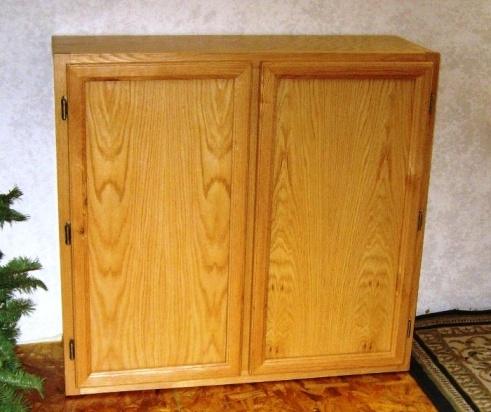
🚪 Shoe Rack with Doors
Add a simple cabinet face frame and two doors to hide shoes completely. A great way to keep an entryway tidy.
Tips for Beginners
- Always pre-drill. Driving screws directly into 2x4s without pre-drilling can split the wood, especially near the ends.
- Use glue AND screws. Wood glue alone is stronger than screws alone — together they’re almost unbreakable. Apply glue to every joint.
- Check for square often. Use a speed square to check your angles during assembly. Much easier to fix before the glue sets.
- Let the glue dry. Don’t rush past the drying steps. 20–30 minutes before moving on keeps joints tight.
- Sand with the grain. Always sand in the direction of the wood grain to avoid scratches that show up after staining.
this post contains affilaite links, i will maybe earn small commision at no cost to you
Frequently Asked Questions
🚀 Ready to build faster and without mistakes?
Get instant access to 16,000+ woodworking plans with step-by-step instructions, diagrams, and material lists:
👉 [Start Building Today →]

“DIY woodworking enthusiast who started with zero experience and a YouTube tutorial.
I build simple, practical projects for my home and share free plans
so other beginners can skip the guesswork.If I can build it, you can too.”