Choosing the right joinery method can make or break your woodworking project. Whether you’re building furniture or tackling home improvements, the joint you select determines both strength and appearance. This comprehensive guide walks you through nine essential wood joinery techniques, helping you match the right method to your specific project needs, tools, and skill level.
Table of Contents
- Evaluating Wood Joinery Methods: Criteria For Selection
- Common Wood Joinery Methods List And Details
- Comparison Of Wood Joinery Methods: Strength, Tools, And Applications
- Choosing The Right Wood Joinery Method For Your Project
- Enhance Your Woodworking Skills With Expert Plans And Tips
Key takeaways
| Point | Details |
|---|---|
| Joint strength varies widely | Different joinery methods offer vastly different load-bearing capabilities and durability levels |
| Tool requirements differ significantly | Some joints need only basic hand tools while others demand specialized router bits or dado blades |
| Application drives selection | Project type, stress points, and aesthetic goals should guide your joinery choice |
| Skill progression matters | Start with simpler joints like dowels before advancing to complex mortise and tenon work |
| Reinforcement extends capabilities | Even basic butt joints can perform adequately with proper mechanical fasteners and adhesives |
Evaluating wood joinery methods: criteria for selection
Before diving into specific techniques, you need a framework for evaluating which joint suits your project. The strength of any joint depends heavily on the wood species, the precision of the fit, and the specific forces it needs to resist. Understanding how wood selection influences your joinery outcomes helps you make smarter decisions from the start.
Consider these essential factors when choosing your joinery method:
- Structural requirements and load-bearing expectations for the finished piece
- Available tools in your workshop and budget for new equipment
- Your current skill level and willingness to learn precision techniques
- Visibility of the joint in the completed project
- Time constraints and production efficiency needs
Pro Tip: Match your joint selection to the weakest link in your project chain. If you’re using softer wood species, even the strongest joint won’t compensate for material limitations.
The application context matters enormously. Frame construction demands different joints than panel assembly or trim work. High-stress connection points like chair legs require joints that can handle repeated racking forces. Meanwhile, decorative elements might prioritize clean appearance over raw strength.
Your finishing preferences also influence joint choice. Some joints like dovetails showcase craftsmanship proudly. Others like biscuits remain completely hidden. Think about whether you want the joinery to be a design feature or disappear entirely.
Common wood joinery methods list and details
Let’s examine nine fundamental joinery techniques every woodworker should understand. Each offers distinct advantages for specific applications.
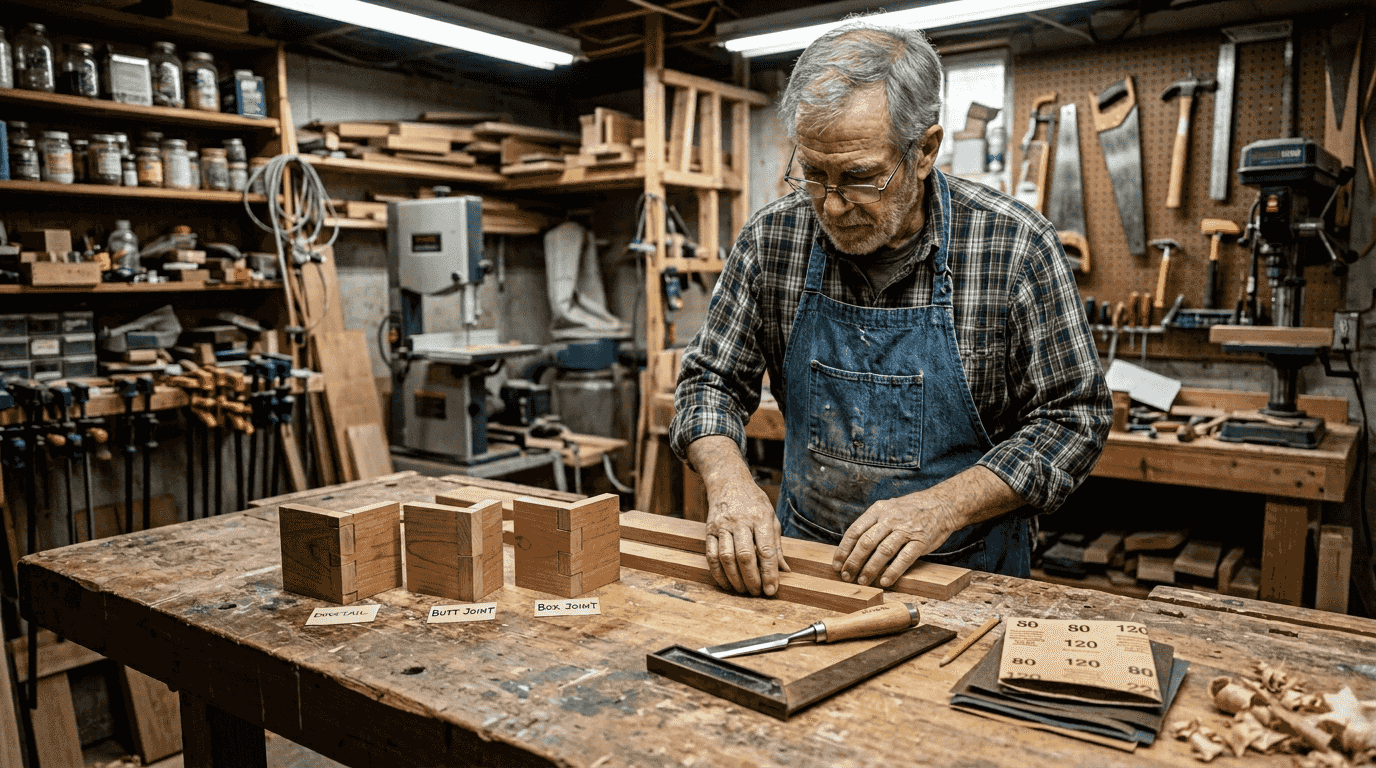
Butt Joint: The simplest connection, where two pieces meet end to end or edge to face. Butt joints are weak due to minimal glue surface, requiring reinforcement. Most woodworkers strengthen them with screws, nails, or pocket hole joinery. They work adequately for non-structural applications like basic shelving.
Mitered Butt Joint: This variation cuts both pieces at matching angles, typically 45 degrees, hiding end grain. You see mitered joints everywhere in picture frames and crown molding. They offer a cleaner appearance than standard butt joints but share the same structural weakness.
Dowel Joint: This method uses cylindrical wooden pins inserted into precisely aligned holes. Dowels provide moderate strength while keeping hardware hidden. The technique remains accessible for hobbyists who can drill accurate holes using simple jigs. These joints work well for face frames, edge joining boards, and light-duty furniture.
Box Joint: Interlocking square fingers cut at right angles create this classic joint for boxes and drawers. Box joints differ from finger joints; box joints join at right angles mainly for boxes and cabinets. They provide excellent glue surface area and mechanical strength. A table saw with a dado blade makes cutting box joints straightforward once you dial in the setup.
Finger Joint: Often confused with box joints, finger joints provide strong longitudinal joints with large gluing surface area, capable of up to 80% of solid wood tensile strength. These joints extend wood length rather than joining at corners. Lumber mills use finger joints extensively to create longer boards from shorter pieces.
Mortise and Tenon: The gold standard for furniture frames, this traditional joint features a projecting tenon that fits into a matching mortise cavity. Mortise and tenon joints offer superior strength in high-stress furniture applications. They excel in chairs, tables, bed frames, and door construction. The joint handles stress from multiple directions exceptionally well.
Dovetail Joint: Recognizable by its interlocking trapezoidal pins and tails, the dovetail represents pinnacle woodworking craftsmanship. The joint resists pulling forces naturally through its mechanical geometry. You’ll find dovetails in quality drawer construction and decorative box work. Hand-cut dovetails require patience and practice, though router jigs simplify the process.
Lap Joint: Two pieces overlap with material removed from each so surfaces sit flush. This increases glue surface dramatically compared to butt joints. Half-lap joints work beautifully in frame construction and cabinet face frames. They’re easier to cut accurately than mortise and tenon joints while offering decent strength.
Biscuit Joint: Small oval wood wafers fit into matching slots cut by a specialized biscuit joiner tool. The compressed biscuits expand when glue activates, creating tight joints. These excel at aligning panels during glue-up and adding modest reinforcement. Biscuit joints shine in cabinet carcass assembly and edge-to-edge board joining.
Building essential woodworking skills helps you execute these techniques properly. Understanding how joinery techniques impact furniture strength guides better project planning.
Comparison of wood joinery methods: strength, tools, and applications
Comparing joints side by side clarifies which technique suits your specific needs. This table breaks down critical factors:
| Joint Type | Relative Strength | Tool Investment | Skill Level | Best Applications |
|---|---|---|---|---|
| Butt Joint | Low | Minimal | Beginner | Non-structural shelving, temporary assemblies |
| Mitered Butt | Low | Moderate | Beginner | Picture frames, trim work, decorative elements |
| Dowel Joint | Medium | Low | Intermediate | Face frames, edge joining, light furniture |
| Box Joint | High | Moderate | Intermediate | Boxes, drawers, cabinet construction |
| Finger Joint | Very High | High | Advanced | Length extensions, structural lumber |
| Mortise & Tenon | Very High | Moderate to High | Advanced | Furniture frames, chairs, heavy-duty construction |
| Dovetail | Very High | Moderate to High | Advanced | Drawers, decorative boxes, heirloom pieces |
| Lap Joint | Medium to High | Low | Intermediate | Frames, cabinet faces, grid structures |
| Biscuit Joint | Medium | Moderate | Intermediate | Panel alignment, edge joining, cabinet assembly |
Strength ratings reflect the joint’s performance under typical furniture loads with proper execution. Real-world performance depends heavily on wood species, glue quality, and craftsmanship.
Tool investment varies considerably. Butt and lap joints need only basic saws and squares. Biscuit joints require a dedicated biscuit joiner, typically $100 to $300. Finger jointing tools have an initial investment barrier for beginners, often requiring router setups or specialized bits costing several hundred dollars.
Pro Tip: Start with dowel joints when graduating from basic butt joints. You’ll learn precision drilling and alignment skills that transfer directly to more advanced techniques later.
Skill progression matters more than many beginners realize. Jumping straight to hand-cut dovetails often leads to frustration. Build competence with beginner woodworking techniques before tackling complex joinery. Master accurate measuring, square cutting, and controlled chisel work first.
Application specificity helps narrow choices quickly. Building drawers? Dovetails or box joints make sense. Assembling cabinet faces? Lap joints or dowels work perfectly. Constructing a dining table? Mortise and tenon joints provide the strength you need.
Reinforcement options expand what simple joints can handle. Pocket hole screws transform weak butt joints into serviceable connections for painted projects. Metal corner brackets add insurance to mitered frames. Don’t dismiss basic joints entirely when proper reinforcement meets your needs.
Choosing the right wood joinery method for your project
Selecting the optimal joint requires balancing multiple factors against your specific situation. Start by honestly assessing your project’s structural demands. A bookshelf holding heavy hardcovers needs stronger joinery than a decorative shadow box.
Match techniques to your current tool collection and realistic budget. Buying a $400 router setup for a single project makes little financial sense. Conversely, investing in quality tools pays dividends across many future builds. Consider whether you’re solving a one-time problem or building long-term capability.
A well-made dowel joint is adequate for most furniture and cabinet projects and faster and easier to make than a mortise and tenon. This practical reality matters for hobbyists working on weekends with limited shop time. Perfect becomes the enemy of good when complexity prevents project completion.
Follow this decision framework:
- Identify load-bearing requirements and stress directions
- Determine if joints will be visible or hidden
- Inventory your current tools and skills honestly
- Calculate time available for learning and execution
- Choose the strongest joint you can execute reliably
Your skill level sets practical boundaries. Attempting techniques beyond your current ability wastes materials and creates frustration. Better to execute a simpler joint excellently than botch a complex one. Success builds confidence and skills for next time.
The best joint for your project is the one you can execute accurately with your current tools and skills while meeting structural requirements.
Gradual tool investment makes sense as your skills and project ambitions grow. Start with versatile tools like quality squares, sharp chisels, and reliable drill guides. Add specialized equipment as specific techniques become regular parts of your work. This approach spreads costs while ensuring you understand each tool’s value before purchasing.
For heirloom-quality furniture requiring multi-generational durability, mortise and tenon joints justify the extra effort. These projects deserve techniques that will outlast you. Meanwhile, painted storage projects or shop fixtures work fine with reinforced butt joints or pocket holes.
Understanding how different joinery techniques affect furniture strength helps you make informed tradeoffs between effort and performance. Not every project needs maximum strength joints.
Enhance your woodworking skills with expert plans and tips
Mastering joinery techniques opens doors to more ambitious woodworking projects. You’ll build furniture that lasts generations rather than years. Detailed plans eliminate guesswork about which joints work best for specific designs.

Explore comprehensive guides explaining why woodworking plans improve project success and reduce costly mistakes. Quality plans specify appropriate joinery for each connection, matching techniques to structural requirements. This guidance proves invaluable when building your first complex piece.
Developing essential woodworking skills alongside joinery knowledge creates a foundation for creative expression. You’ll move beyond copying plans to designing original pieces that reflect your vision. Strong joinery skills give you confidence to experiment with different wood species and project scales.
FAQ
What are the strongest wood joinery methods?
Mortise and tenon joints are structurally superior for enduring high-stress applications like furniture frames and load-bearing connections. Dovetail joints provide excellent strength specifically for drawer construction and boxes where pulling forces dominate. Finger joints offer exceptional longitudinal strength when extending board length.
Can beginners make strong joints without expensive tools?
Dowel joints are faster, easier and require lower tool investment, suitable for beginners while delivering reliable furniture-grade strength. Biscuit joints also perform well with moderate tool costs. Both techniques teach precision and alignment skills that transfer to advanced methods. Quality results depend more on careful execution than tool expense for these beginner-friendly techniques.
How can I reinforce a basic butt joint?
Use pocket holes and wood putty to hide screws and strengthen butt joints significantly beyond glue alone. Drilling angled holes through one piece into the other creates mechanical reinforcement. Fill exposed holes with matching wood putty for painted projects. Additional options include corner brackets, dowels inserted perpendicular to the joint, or splines glued into matching slots.
What tools do I need for finger joints?
Finger joints require a router with finger joint bit and a table saw with dado blade, representing a higher initial tool investment than simpler techniques. Router table setups improve consistency and safety when cutting interlocking fingers. Some woodworkers use specialized finger joint jigs for hand routers. These tools demand practice to master but enable professional-quality results. Building fundamental woodworking skills before investing in finger joint equipment ensures you’re ready for the precision required.