TL;DR:
- Finishes protect wood from moisture, scratches, and wear, extending a project’s lifespan.
- Film finishes like polyurethane form a hard shell; penetrants like oil soak into the wood.
- Choosing the right finish depends on project use, wood type, desired look, and maintenance commitment.
Most woodworkers treat finish as the final flourish, something you slap on at the end to make a project look pretty. That thinking leads to cracked tabletops, warped shelves, and pieces that look tired within a year. The truth is that finish is a functional layer, not a cosmetic one. It determines how long your project lasts, how it feels under your hands, how easily you can fix it later, and whether the wood holds up against everyday life. Once you understand what finish actually does, every decision you make at the workbench gets smarter.
Table of Contents
- What does wood finish actually do?
- Common types of wood finishes explained
- How finish impacts durability, feel, and maintenance
- Picking the right finish for your next project
- A woodworker’s perspective: What most guides miss about finishes
- Level up your woodworking projects with expert plans
- Frequently asked questions
Key Takeaways
| Point | Details |
|---|---|
| Finish protects wood | A proper finish shields wood from moisture, damage, and improves project lifespan. |
| Type impacts feel and care | Film finishes offer more durability, while penetrating oils feel natural but require regular maintenance. |
| Choose based on use | Pick finishes that match your project’s purpose, repair needs, and your skill comfort. |
| Repairability matters | Shellac and lacquer are easy to fix, whereas polyurethanes need more effort to repair. |
| Plan finishing early | Decide on a finish before assembly to ensure best results and easier application. |
What does wood finish actually do?
Wood is alive in a way most people forget. Even after it’s been cut, dried, and shaped, it still responds to moisture, heat, and touch. Without a protective layer, raw wood absorbs water, swells, shrinks, stains, and wears down fast. That’s not a theory. It’s what happens to unfinished cutting boards, outdoor furniture, and bare shelves within a single season.
The wood finish benefits go well beyond looks. A good finish does several jobs at once:
- Protection from moisture: Prevents swelling, shrinking, and warping caused by humidity changes.
- Surface hardness: Creates a layer that resists scratches, dents, and daily wear.
- Grain enhancement: Brings out the natural color and depth of the wood figure.
- Tactile improvement: Changes how the surface feels, from silky smooth to raw and natural.
- Repairability: Determines how easy it is to fix damage down the road.
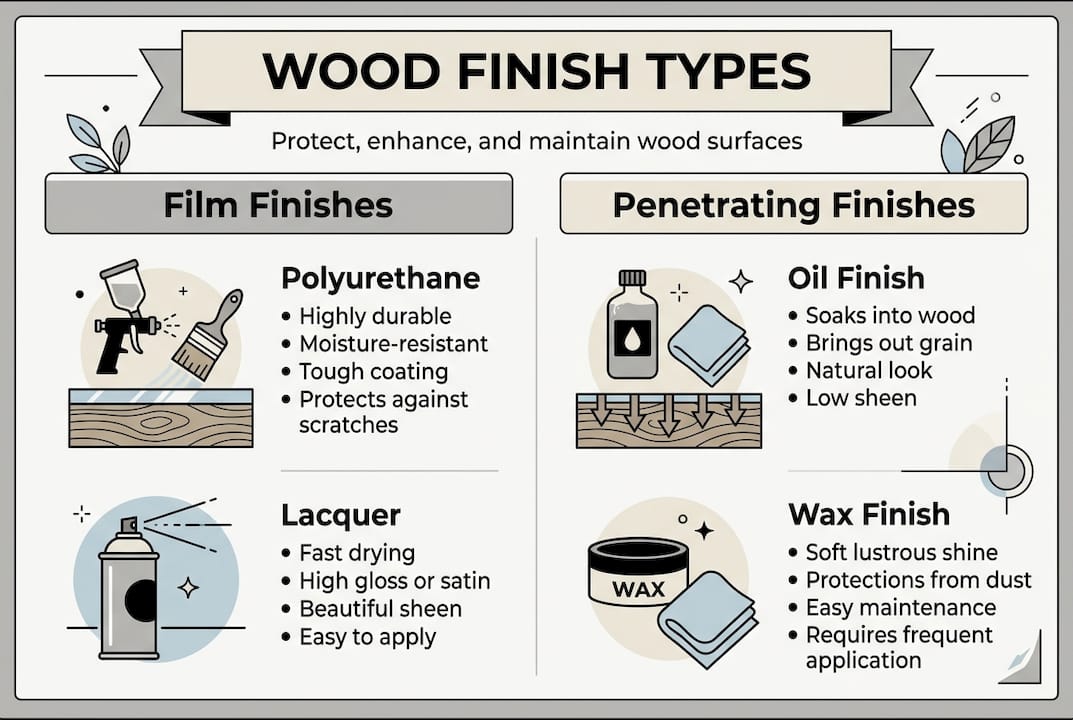
Understanding the two main finish categories is the foundation of smarter finishing. As finishes create either a protective film or penetrate the wood, they affect durability, feel, and repairability in completely different ways. Film-building finishes like polyurethane and lacquer sit on top of the wood and cure into a hard shell. Penetrating finishes like oil and wax soak into the wood fibers and harden from within.
Neither category is universally better. Film finishes offer stronger protection but can feel plastic-like. Penetrating finishes feel natural but need more frequent upkeep. Knowing which category you’re working with before you open the can saves a lot of frustration later.
Leaving wood unfinished is almost never the right call for functional pieces. Bare wood in a kitchen, bathroom, or high-traffic area will stain, swell, and degrade within months. Even decorative pieces benefit from at least a light protective coat to stabilize the wood and prevent dust absorption.
Pro Tip: Before finishing your actual project, brush or wipe your chosen finish onto a piece of scrap from the same board. Let it cure fully. This tells you exactly how the color will shift, how the grain will look, and whether the finish is compatible with your wood species.
Exploring wood finishing techniques early in your learning curve will save you from costly mistakes on projects you’ve spent hours building.
Common types of wood finishes explained
Now that we’ve established why finish matters, let’s look at which types actually exist and what makes each unique.
For beginners, the options can feel overwhelming. Polyurethane, varnish, lacquer, shellac, tung oil, linseed oil, wax. Each one has its fans and its critics. The key is matching the finish to the project, not picking one because it’s popular.
Film finishes build up on the wood surface and cure into a hard, protective shell:
- Polyurethane: The most popular choice for beginners. Tough, water-resistant, and available in oil-based or water-based formulas. Oil-based polyurethane offers superior protection but yellows over time; water-based dries clearer and faster.
- Varnish: Similar to polyurethane but often more flexible and UV-resistant, making it a strong choice for outdoor projects.
- Lacquer: Dries fast and buffs to a beautiful sheen. Popular for furniture and cabinetry, but requires good ventilation.
Penetrating finishes soak into the wood rather than sitting on top:
- Tung oil and linseed oil: Classic choices for a natural, matte look. They feel like bare wood and are easy to apply, but film finishes prioritize max durability over what penetrating oils can offer.
- Wax: Adds a soft sheen and silky feel. Easy to apply and buff, but offers minimal moisture protection.
| Finish type | Best for | Durability | Repair method |
|---|---|---|---|
| Oil-based polyurethane | Tables, floors, heavy-use furniture | Very high | Sand and recoat |
| Water-based polyurethane | Light furniture, toys | High | Sand and recoat |
| Varnish | Outdoor pieces | High | Sand and recoat |
| Lacquer | Cabinets, decorative furniture | Medium | Dissolve and re-apply |
| Tung or linseed oil | Decorative boxes, natural-look pieces | Low to medium | Wipe on fresh coat |
| Wax | Low-traffic decorative items | Low | Buff and reapply |
A common beginner mistake is falling in love with penetrating oils because they’re easy to apply, then forgetting that they need to be reapplied regularly. Skipping that maintenance schedule means your wood loses protection fast. Check out these DIY finishing tips to stay ahead of common pitfalls. Knowing your furniture wood durability also helps you match the right finish to the right species.
How finish impacts durability, feel, and maintenance
With the finish types understood, let’s break down how your choice directly affects your woodworking project’s real-world performance.
Durability is the most obvious factor, but it’s often misunderstood. A harder finish doesn’t always mean a better finish. It means a different kind of protection with different trade-offs.
| Finish | Durability rating | Estimated lifespan | Notes |
|---|---|---|---|
| Oil-based polyurethane | 5/5 | Many years | Rated highest for durability, slight yellowing |
| Hardwax oil | 3/5 | 3 to 5 years | Easier to recoat in sections |
| Penetrating oil | 2/5 | 1 to 2 years | Needs annual refresh |
| Wax | 1/5 | 6 to 12 months | Lowest protection, easiest to apply |
Feel is something finish guides rarely discuss in enough depth. Run your hand across a polyurethane-coated table and you feel the finish, not the wood. It’s smooth and slightly plastic. Run your hand across an oil-finished piece and you feel the wood grain directly. Neither is wrong, but they create very different emotional responses in the person using the piece.
“The finish you choose changes not just how your project looks, but how it feels to live with every single day.”
Maintenance is where most beginners get caught off guard. Here’s what each category actually requires:
- Film finishes (poly, varnish, lacquer): Clean with a damp cloth. Avoid harsh chemicals. Sand lightly and recoat if the surface gets scratched or dull.
- Penetrating oils: Wipe down regularly with a dry cloth. Reapply a thin coat every 12 months or when the wood starts to look dry.
- Wax finishes: Buff periodically with a soft cloth. Reapply wax every few months for pieces that see regular handling.
Repairability is a huge factor that most beginners overlook when choosing a finish. Shellac and lacquer re-melt when fresh product is applied, so scratches and damage can be fixed invisibly. Polyurethane and varnish don’t re-melt. They require sanding back the damaged area and feathering in a new coat, which is harder to do without visible lines. Understanding furniture grade wood and how it interacts with your finish choice helps you plan for long-term care. A good wood grain guide also shows you why open-grain woods absorb penetrating finishes differently than tight-grain species.
Picking the right finish for your next project
Having examined finish advantages and limitations, it’s time to apply this knowledge directly to your project choices.
Choosing the right finish doesn’t have to be complicated. Follow these steps and you’ll land on the right answer almost every time:
- Define how the piece will be used. A dining table needs maximum durability. A decorative box can handle something lighter.
- Consider the wood species. Open-grain woods like oak absorb penetrating finishes beautifully. Tight-grain woods like maple work better with film finishes.
- Decide on the look you want. Natural and matte? Go penetrating. Glossy and protective? Go film.
- Be honest about your maintenance commitment. If you won’t remember to reapply oil annually, choose a film finish that needs less attention.
- Think about future repairs. If you’re likely to move, modify, or refinish the piece later, choose shellac or lacquer for easier fixes.
Here’s a quick-reference guide for common project types:
- Dining tables and desks: Oil-based polyurethane for maximum durability.
- Decorative boxes and small items: Tung oil or wax for a natural look.
- Kids’ toys: Water-based polyurethane or food-safe oil (check label for safety).
- Outdoor pieces: Exterior varnish or teak oil for weather resistance.
Pro Tip: As a beginner, lean toward finishes that forgive mistakes. Shellac and water-based poly are both easy to apply and easy to fix. Save the tricky finishes like lacquer for when you’ve built more confidence.
The do’s and don’ts of finishing success:
- Do sand between coats for a smoother final surface.
- Do apply thin coats rather than thick ones.
- Don’t skip surface prep. Finish reveals every scratch and mill mark.
- Don’t apply finish in dusty or humid conditions.
- Don’t ignore repairability when choosing a finish. Shellac and lacquer allow invisible fixes, while poly and varnish require sanding back.
Building your knowledge of wood finishing techniques alongside smart wood selection in woodworking will make every project turn out better from start to finish.
A woodworker’s perspective: What most guides miss about finishes
To round out the evidence-based guidance, here’s a candid look from a real woodworking perspective.
Most finishing guides treat the decision like a math problem. Highest durability rating wins. But that misses something important. The best finish for your project is the one that fits your life, not just the wood.
Beginners often reach for the toughest finish available, thinking they’re being smart. Then two years later, they want to change the color, strip the piece, or repair a deep scratch, and they’re stuck with a finish that fights back. Hard-to-remove finishes are a real regret for anyone whose tastes or plans evolve.
The workshop lesson that took years to learn is this: finish is a commitment. Choose one that matches not just your project today, but where you think that project might go. A piece you’re still experimenting with deserves a forgiving finish. A piece you’re building to last a lifetime deserves the tough stuff.
Embrace imperfection early. Your first few finishing attempts will have drips, bubbles, or brush marks. That’s normal. These woodworking beginner tips will help you build confidence faster. Every mistake on scrap wood is a lesson you don’t have to pay for on your actual project.
Level up your woodworking projects with expert plans
Armed with the knowledge of wood finishes, it’s time to explore resources to bring your next project to life.
Knowing your finish is only half the equation. The other half is having a plan that accounts for finishing from the very start, not as an afterthought. Well-designed DIY project plans factor in wood species, joinery, and finish compatibility before you cut a single board.

At Real Wood Work Plans, we offer detailed plans built for hobbyists and beginners who want real results without the guesswork. Explore the DIY woodworking benefits of building your own furniture, from saving money to building a skill that lasts a lifetime. Browse our free woodworking plans and find your next project today.
Frequently asked questions
Which wood finish is the most durable for beginners?
Oil-based polyurethane offers top durability and is beginner-friendly, though water-based polyurethane is easier to apply, dries faster, and stays clearer over time.
How often should I reapply a penetrating oil finish?
Penetrating oils need an annual refresh to maintain their protective qualities and keep the wood looking its best.
Can I repair scratches in all wood finishes easily?
Shellac and lacquer dissolve for invisible fixes, while polyurethanes and varnishes require sanding back the damaged area before recoating.
Is it necessary to finish every woodworking project?
Finishing is essential for most projects because finishes protect, enhance, and improve the feel and longevity of the wood, especially for any piece that sees regular use.
Recommended
- Why Finish Wood: Protecting and Enhancing Projects
- Finishing wood explained: techniques and tips for DIY projects
- Master sanding in woodworking for flawless finishes
- Why sand wood surfaces? Improve quality and finish

“DIY woodworking enthusiast who started with zero experience and a YouTube tutorial.
I build simple, practical projects for my home and share free plans
so other beginners can skip the guesswork.If I can build it, you can too.”