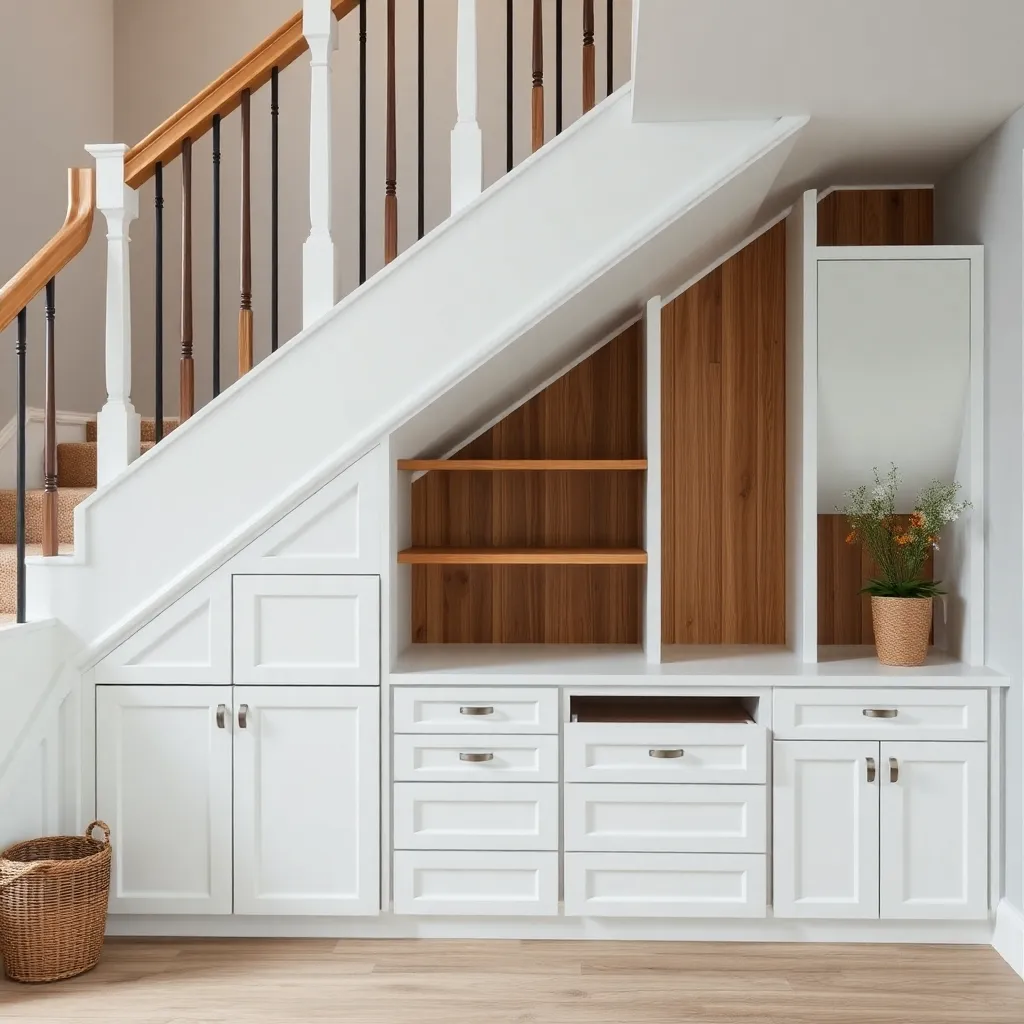
The space under a staircase is the largest untapped storage area in most homes — it’s equivalent to a small closet but typically occupied only by darkness and dead air. These six builds convert the under-stair space to functional storage, from a simple open shelf system to a full built-in with drawers, a door, and integrated lighting.
Ted’s Woodworking has complete under-stair storage plans with angled-cut guides for stair slopes. Browse Ted’s plans →
Step 1: Add Simple Open Shelves Under the Stairs

Goal: A basic shelf system in the open under-stair space — no drywall removal required.
If the under-stair space is already open (no drywall on the stair side), install a simple shelf system directly:
- Measure the stair slope — capture the angle with a bevel gauge
- Build vertical shelf dividers in varying heights (each 12 inches apart horizontally, cut taller as the stairs rise)
- Install horizontal shelves between the dividers
- Add baskets, bins, or boxes on the shelves
The stair stringers (the angled side boards of the stairs) are the natural support surfaces for the shelving system. Screw a horizontal ledger into each stringer at shelf height.
Milestone: Shelves at consistent heights across the full under-stair depth, with no shelf more than ¼ inch off level.
Step 2: Build a Closet With a Door in the Under-Stair Opening

Goal: Convert the under-stair space to an enclosed closet with a hinged door — the standard conversion.
Frame the opening if not already framed. Install a pre-hung interior door (30 × 80 inches is standard; trim the door height if the opening is shorter under the lowest stair). Inside: install the same shelving system as Step 1. The door creates an enclosed space that looks like a built-in closet from the hallway.
Framing the opening: a rough opening 2 inches wider and 2½ inches taller than the door size. Use 2×4 framing (jack studs, king studs, header). Drywall the exterior face. Install door casing to match existing trim.
Milestone: A door that swings freely, latches cleanly, and whose casing aligns with the existing hallway trim.
Step 3: Build a Pull-Out Drawer System Under the Stairs

Goal: A system of large pull-out drawers replacing the fixed shelves — for bulky items that are hard to access on deep shelves.
Under-stair storage suffers from the “cave” problem — items pushed to the back are hard to reach. Pull-out drawers solve this: the entire shelf contents roll out to you. Build three wide drawers (each 36 × 16 × 24 inches) on heavy-duty full-extension slides (rated for 100 lbs each). The drawers roll out on slides mounted on the stringer and a center support rail on the floor.
Each drawer is a simple plywood box (no face frame needed if the drawer front covers the opening). Add a D-ring pull on the front. Load with bins and labeled boxes.
Milestone: Three drawers that extend fully (24 inches) and roll smoothly under a 40-lb load.
Step 4: Build Shoe Storage Under the Stairs

Goal: A dedicated shoe storage section with angled shoe shelves — for entryway or mudroom shoe storage.
The under-stair space near the front door is ideal for shoe storage. Build angled shoe shelves (shelves tilted 10° forward to display shoes face-out and prevent them from falling):
- One shelf tier per 6 inches of vertical rise
- Each tier 14 inches deep (fits most shoes)
- Each tier 36–48 inches wide
The stair slope means the left side of each shelf is a different height than the right — build each shelf unit with the vertical dividers cut to match the stair angle at their position.
Milestone: Angled shelves that display shoes face-out with consistent forward tilt across the full width.
Step 5: Build a Kids’ Toy Storage Under the Stairs

Goal: An open under-stair storage system with large cubbies for toy bins — designed for child access.
Children’s toy storage under the stairs works best with large, open cubbies (18 × 18 × 18 inches) that accommodate large toy storage bins. Build the cubby grid with the lowest cubbies accessible to young children (under 24 inches from the floor) and higher cubbies for adult-accessible storage.
Add a simple base (4 inches tall) that raises the cubbies off the floor for sweeping. Install LED puck lights inside the top row of cubbies — under-stair spaces are dark, and children are more likely to put toys away if they can see what goes where.
Milestone: Bottom-row cubbies reachable by a 4-year-old (under 24 inches from the floor).
Step 6: Build a Full Built-In With Drawers, Doors, and Lighting

Goal: A complete built-in under-stair storage unit with face frames, inset doors, drawers, and LED lighting — the premium conversion.
This is the full finish-carpentry build. The built-in looks like furniture, not storage:
Frame: build a full-height face frame (¾ × 1½-inch poplar stiles and rails) that covers the entire under-stair opening and matches the surrounding trim profile.
Doors and drawers: install 3 inset doors (with full-overlay hinges) for the tall sections and 3 drawers (with full-extension slides) in the base section.
Interior: fixed shelves, hooks on the inner door faces, pull-out tray for small items.
Lighting: LED strip under the top face frame rail, connected to a switch on the outside.
Milestone: A built-in that, from the outside, looks like a piece of built-in furniture rather than converted dead space.
Under-Stair Storage Plans FAQ
How do I measure the under-stair space for a storage build?
The challenge: the stair slope means every vertical measurement is different. Measure the width of the opening at the floor (constant). Then measure the height at multiple horizontal points — every 12 inches from the open end to the closed end. Record: width (W), depth (D from the opening face to the back wall), and height at each 12-inch interval (H1, H2, H3…). The smallest height measurement is your maximum height for any element at that position. Draw this profile on paper to scale — it shows you exactly what will fit where. The standard stair slope is approximately 7 inches of rise per 11 inches of run (about 32°), but measure your specific stairs rather than assuming the standard.
Do I need a building permit to convert under-stair space to storage?
In most jurisdictions, no permit is required for adding shelving or drawers inside an existing space. If the project involves framing a new wall opening (adding a door where there was solid wall), a permit may be required depending on local codes — check with your local building department. Under-stair spaces in some homes are fire-rated (especially in multi-family buildings) — adding combustible shelving materials inside a fire-rated enclosure may require a permit. In single-family homes with a standard non-rated under-stair space, a shelf or drawer addition generally doesn’t require permits.
What is the minimum height needed to use under-stair space effectively?
36 inches is the practical minimum for useful storage — at this height, you can store large bins, shoeboxes, or small luggage. 48 inches allows a short hanging rod for kids’ coats or jackets. 60 inches is a comfortable closet height for adults (reaching the back of a 24-inch-deep shelf without bending). The space nearest the open stair end (the lowest section) is typically 24–36 inches tall and works best for very flat or wide items — flat storage bins, rolled rugs, or sports equipment. Plan the storage type to match the height at each section of the under-stair space.
How do I handle the angled cut at the back of an under-stair shelf?
Two approaches: (1) Level shelves with a riser: build the shelf perfectly level and install a triangular filler between the back of the shelf and the angled stair stringer above. This is easier to build because all shelves are simple rectangles. (2) Angled back cut: cut the back edge of each shelf at the angle of the stair (use a bevel gauge to capture the angle). The shelf back rests flush against the stringer with no gap. The angled cut is more professional-looking but requires transferring the angle accurately to each shelf. For a closed-in system with a door: approach 1 is faster and the filler is hidden. For an open system: approach 2 looks cleaner.

“DIY woodworking enthusiast who started with zero experience and a YouTube tutorial.
I build simple, practical projects for my home and share free plans
so other beginners can skip the guesswork.If I can build it, you can too.”