
Many beginners assume hand tool woodworking is slow, imprecise, and outdated compared to modern power tools. This couldn’t be further from the truth. Hand tool woodworking offers unmatched control, quiet operation, and superior tactile feedback for creating handcrafted furniture and projects. Whether you’re building your first wooden box or planning a coffee table, understanding hand tools transforms your approach to woodworking. This guide will reveal what hand tool woodworking truly entails, which tools you need to start, and why these traditional methods remain essential for today’s hobbyist.
Table of Contents
- Definition And History Of Hand Tool Woodworking
- Comparison Of Hand Tools Vs Power Tools For Woodworking
- Essential Hand Tools For Beginners And Their Uses
- Fundamental Hand Tool Woodworking Techniques And Skills
- Common Misconceptions About Hand Tool Woodworking
- Benefits Of Using Hand Tools In Woodworking
- Step By Step Guidance For Beginners To Start Hand Tool Woodworking
- Frequently Asked Questions About Hand Tool Woodworking
Key Takeaways
| Point | Details |
|---|---|
| Manual precision | Hand tool woodworking uses manual tools like planes, saws, and chisels for precise, handcrafted results with superior tactile control. |
| Essential starter kit | Beginners need 7 to 9 core hand tools including a hand saw, jack plane, chisels, marking gauge, and combination square to start effectively. |
| Quiet, clean workspace | Hand tools produce minimal noise and dust compared to power tools, creating healthier and more peaceful home workshop environments. |
| Skill development time | Mastering fundamental techniques typically requires 20 to 40 hours of practice to build muscle memory and confidence. |
| Myth versus reality | Common misconceptions about speed and precision are false with proper technique and practice. |
Definition and History of Hand Tool Woodworking
Hand tool woodworking is the practice of shaping, cutting, and assembling wood using manual tools powered entirely by human effort. Unlike power tool woodworking that relies on electricity or batteries, hand tool methods depend on your physical strength, coordination, and technique to achieve results.
This approach dates back thousands of years and forms the foundation of all woodworking traditions. Before the Industrial Revolution introduced powered machinery, craftspeople relied exclusively on hand tools to create everything from simple boxes to ornate furniture. Egyptian carpenters used bronze chisels and saws around 3000 BCE. European joiners perfected hand plane designs by the 18th century.
Understanding this evolution helps you appreciate why hand tools remain relevant today. They teach fundamental woodworking principles that power tools often obscure. When you push a hand plane across a board, you feel grain direction, wood density, and cutting resistance immediately. This sensory feedback builds deeper understanding of wood behavior.
Typical hand tools used in this traditional craft include:
- Hand saws for crosscutting and ripping lumber
- Bench planes for smoothing and shaping surfaces
- Chisels for removing waste and cutting joints
- Marking gauges for layout and measurement
- Spokeshaves for shaping curved surfaces
- Card scrapers for final surface preparation
- Mallets for striking chisels and assembly
The continued use of these tools in 2026 isn’t about nostalgia. Many professional woodworkers and serious hobbyists choose hand tools for specific tasks where they outperform power equipment in precision, control, and surface quality.
Comparison of Hand Tools vs Power Tools for Woodworking
The fundamental difference between hand and power tools lies in how they deliver cutting force and how you control that force. Hand tools require you to generate momentum and guide the cut simultaneously. Power tools generate momentum automatically while you focus primarily on guidance.
This distinction creates significant practical differences in your woodworking experience:
| Aspect | Hand Tools | Power Tools |
|---|---|---|
| Control | Direct tactile feedback allows micro adjustments during cuts | Less sensory feedback, requires setup jigs for precision |
| Speed | Slower for initial cuts, faster for small batches with practice | Much faster for rough cutting and high volume work |
| Noise | Quiet operation suitable for apartments and shared spaces | Loud operation often requires hearing protection |
| Dust | Minimal shavings, easy cleanup | Significant dust requiring collection systems |
| Learning curve | Steeper initially, builds fundamental understanding | Easier to get started, harder to master nuance |
| Cost | Lower initial investment for quality tools | Higher costs for tools and accessories |
Hand tool woodworking provides superior tactile control and precision compared to power tools because you feel wood resistance instantly. When planing a board, you detect grain changes before they cause tearout. With a router, you often discover problems only after they occur.
Environmental and safety factors also differ substantially:
- Hand tools produce no electrical consumption or carbon footprint
- Reduced dust improves respiratory health in home workshops
- Lower noise prevents hearing damage and neighbor complaints
- Fewer kickback risks compared to table saws and routers
- No electrical shock hazards in damp conditions
One experienced craftsman explains the difference perfectly:
The hand plane whispers to you about the wood’s character. The power planer shouts over those subtle messages until it’s too late to respond.
Many beginners assume power tools are always more precise. This misconception stems from confusing repeatability with accuracy. Power tools excel at making identical cuts repeatedly when properly set up. Hand tools excel at making individually perfect cuts adjusted in real time to wood conditions.
For detailed finishing work, hand tools often produce superior results. A sharp hand plane leaves a surface requiring no sanding. A power planer typically leaves machine marks needing extensive sanding to remove. Understanding these tradeoffs helps you choose the right tool for each task.

Essential Hand Tools for Beginners and Their Uses
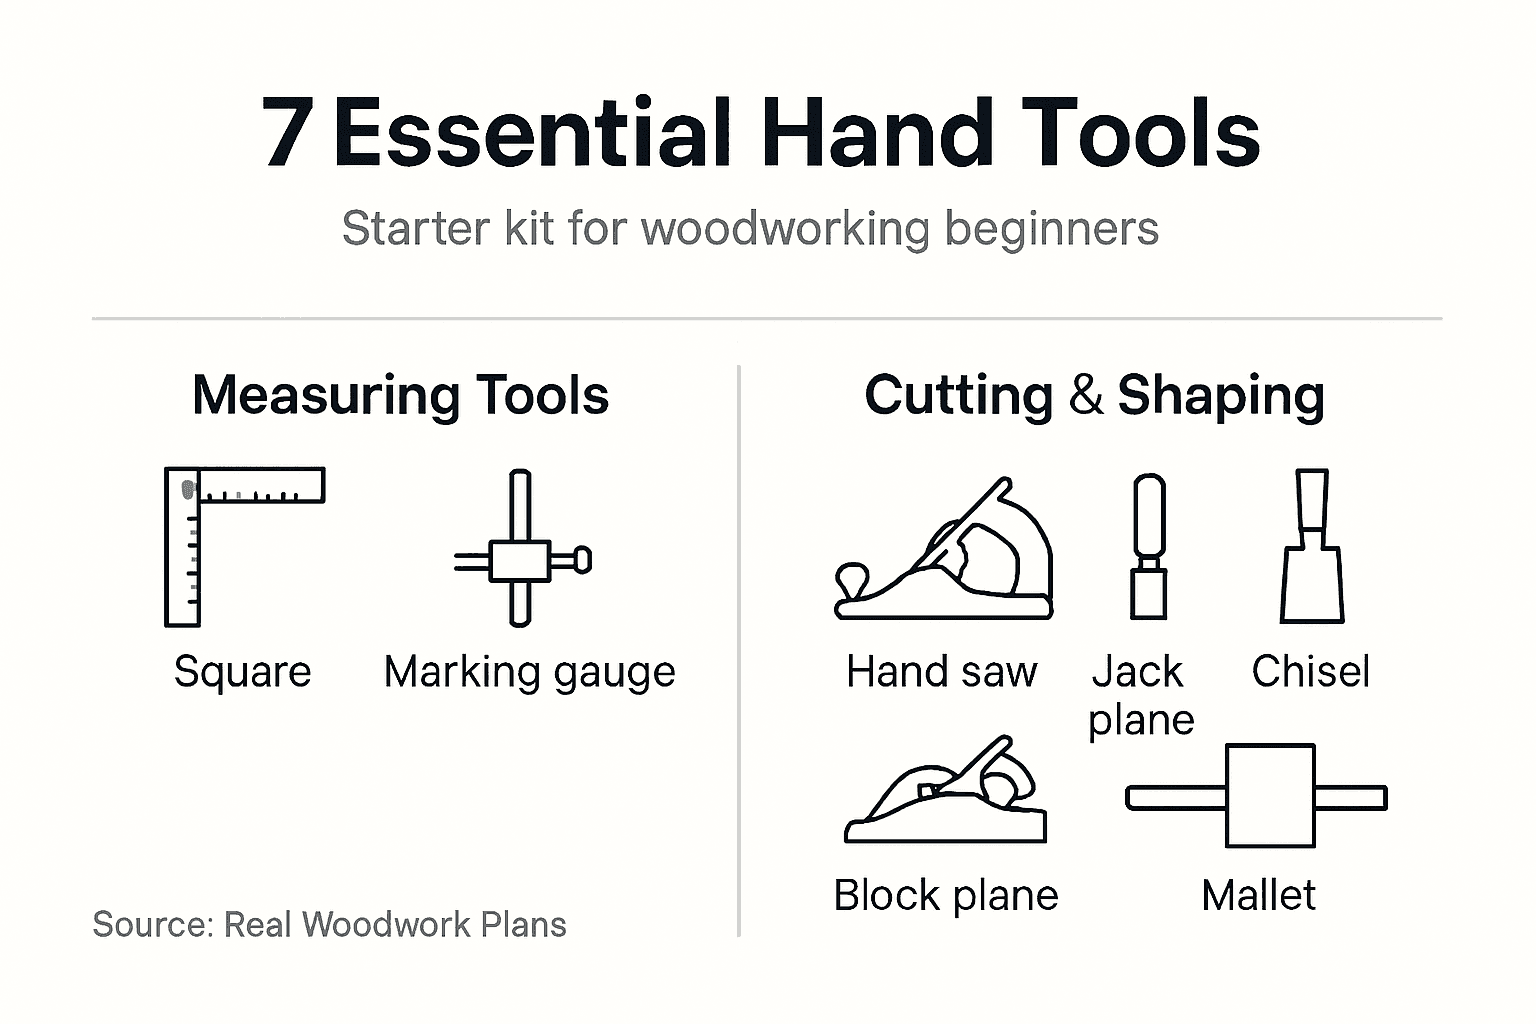
Starting hand tool woodworking doesn’t require a massive investment. Focus on seven to nine essential tools that handle most beginner projects effectively. These core tools let you measure, cut, shape, and smooth wood for boxes, shelves, and simple furniture.
Your essential starter kit should include:
- Combination Square: Marks 90 degree and 45 degree angles accurately, checks squareness of assemblies, and measures depths. Choose one with a 12 inch blade for versatility.
- Marking Gauge: Scribe lines parallel to edges for consistent joinery layout. A wheel style cuts cleaner across grain than pin styles.
- Hand Saw: A 20 to 22 inch crosscut saw with 10 to 12 points per inch handles most cutting tasks. Japanese pull saws offer thinner kerfs and easier control for beginners.
- Jack Plane: A number 5 plane (14 inches long) smooths boards and removes material efficiently. This single plane covers 80% of typical planing needs.
- Block Plane: A low angle block plane trims end grain and fits in tight spaces. Essential for chamfering edges and fine adjustments.
- Bench Chisels: A set of four chisels (1/4 inch, 1/2 inch, 3/4 inch, 1 inch widths) covers most chopping and paring tasks. Buy quality over quantity.
- Mallet: A wooden or dead blow mallet strikes chisels without damaging handles. Avoid metal hammers on chisel handles.
- Card Scraper: This simple rectangle of steel removes tool marks and prepares surfaces for finishing better than sandpaper alone.
- Sharpening Stones: Waterstones or diamond plates in coarse, medium, and fine grits keep edges razor sharp.
When buying starter tools, prioritize sharp cutting edges over fancy features. A $30 vintage Stanley plane properly tuned outperforms many $150 modern planes. Check beginner woodworking tips for detailed tool selection guidance.
Pro Tip: Buy your jack plane and hand saw first. These two tools alone let you dimension lumber and make accurate cuts for initial projects. Add other tools as specific project needs arise rather than buying everything at once.
Ergonomics matter more than most beginners realize. Heavy tools cause fatigue that leads to mistakes and injury. Test tool weight and grip comfort before purchasing. A plane that feels balanced in your hands produces better results than one causing wrist strain after five minutes.
Fundamental Hand Tool Woodworking Techniques and Skills
Learning proper hand tool techniques separates frustrating failures from satisfying successes. These skills build on each other, starting with accurate layout and progressing to controlled cutting and shaping. Mastering skills such as accurate measuring, proper planing, controlled sawing, and safe chisel handling typically requires 20 to 40 hours of practice to develop reliable muscle memory.
Follow these steps to build competency systematically:
-
Master Accurate Measuring and Marking: Always measure twice and cut once. Use your combination square to mark cut lines completely across the board face. Extend lines down edges with a marking knife for precision. Knife lines sever wood fibers, preventing tearout when sawing.
-
Develop Controlled Hand Sawing: Start cuts with short backward strokes to establish the kerf. Keep your forearm, wrist, and saw aligned in one plane. Let the saw’s weight do the work rather than forcing downward pressure. Watch the line on the far edge of the board as you cut.
-
Learn Proper Hand Planing: Stand with your body at 45 degrees to the bench. Grip the front knob firmly while your rear hand provides forward pressure. Apply downward pressure on the front knob at cut start, equal pressure on both hands mid stroke, and rear handle pressure at cut end. This prevents rounding board ends.
-
Practice Safe Chisel Techniques: Always cut away from your body and keep both hands behind the cutting edge. Pare with hand pressure for controlled removal. Use mallet strikes only for chopping waste in mortises. Register the chisel flat side against your layout line for accuracy.
-
Build Sharpening Habits: Sharp tools are safe tools because they require less force and provide better control. Sharpen chisels and plane irons every 30 to 45 minutes of active use. A properly sharpened edge should shave hair off your arm effortlessly.
Explore a comprehensive step by step woodworking skills guide that details proper stance, grip, and motion patterns for each tool type.
Pro Tip: Practice each new technique on scrap wood before attempting it on project pieces. Spend 15 minutes daily with one tool rather than occasional marathon sessions. Consistent short practice builds muscle memory faster than infrequent long sessions.
Safety awareness prevents injuries while building skills. Secure workpieces properly before cutting or planing. Never place your free hand in the tool’s path. Maintain sharp edges to reduce the force required. Dull tools slip and cause accidents far more often than sharp ones.
Common Misconceptions About Hand Tool Woodworking
Several persistent myths discourage beginners from exploring hand tool methods. These misconceptions stem from limited experience and outdated assumptions. Examining evidence reveals a different reality.
Myth: Hand tool woodworking is always slower than using power tools.
Reality: For small projects and individual pieces, hand tools often match or beat power tool speed once you develop proficiency. Setting up a table saw, router, and dust collection takes 15 to 20 minutes. A hand plane is ready instantly. For cutting four table legs to length, hand sawing takes less total time than power tool setup and cleanup.
Power tools excel at high volume production. Hand tools excel at one off pieces and small batches. Speed depends entirely on context and skill level.
Myth: Hand tools cannot achieve the precision of power tools.
Reality: Hand tools provide finer control for precision work. Master furniture makers achieve tolerances under 0.005 inches using hand tools alone. A properly tuned hand plane produces surfaces flat within 0.002 inches across three foot spans. The key difference is that hand tool precision requires skill development, while power tool precision requires accurate setup.
One professional woodworker observes:
I can sneak up on a perfect fit with a hand plane in 30 seconds. The same adjustment on my jointer requires 10 minutes of fence and table tweaking.
Myth: Hand tool woodworking is outdated and inefficient for modern projects.
Reality: Hand tools remain the preferred choice for high end furniture making, instrument building, and restoration work in 2026. Many professional shops use hybrid workflows combining power tools for rough dimensioning and hand tools for precision fitting and finishing. Hand tools aren’t outdated; they’re specialized for tasks requiring maximum control.
Myth: You need exceptional strength to use hand tools effectively.
Reality: Proper technique matters far more than raw strength. Sharp tools and correct body mechanics allow anyone to work effectively. Many successful hand tool woodworkers are women and older adults who rely on skill rather than muscle. Poor technique makes even simple tasks exhausting. Good technique makes difficult tasks manageable.
Recognizing these myths helps you approach hand tool learning with realistic expectations and confidence.
Benefits of Using Hand Tools in Woodworking
Hand tools offer distinct advantages that make them ideal for home hobbyists and small workshop environments. These benefits extend beyond the finished project to improve your entire woodworking experience.
Quiet operation transforms your workshop environment. You can work early mornings or late evenings without disturbing family or neighbors. No hearing protection means you hear music, podcasts, or simply enjoy peaceful focus. This acoustic benefit proves especially valuable in apartments or shared living spaces where power tool noise causes friction.
Minimal dust production creates healthier working conditions. Hand planes produce shavings that fall directly to the floor rather than becoming airborne. No fine dust clouds mean reduced respiratory irritation and easier cleanup. Many hand tool woodworkers skip dust masks entirely except when sanding, improving comfort during long sessions.
Enhanced control and precision come from direct tactile feedback. You feel the tool’s interaction with wood grain instantly and adjust pressure, angle, or direction immediately. This sensory connection develops intuitive understanding of wood behavior that power tools simply cannot provide.
Skill development accelerates through hands on manual methods. Each cut teaches you about grain direction, wood hardness, and edge sharpness. This knowledge transfers to better power tool use if you later incorporate them. Many professional woodworkers credit hand tool experience with deepening their overall woodworking understanding.
Additional practical benefits include:
- Lower initial investment allows quality tools on modest budgets
- Compact tool storage fits small spaces easily
- No electricity required enables outdoor or remote work
- Reduced maintenance costs compared to power equipment
- Quieter workspace promotes better concentration
- Traditional methods connect you to woodworking history
Hand tools also pair perfectly with thoughtful wood selection in woodworking practices. When you work wood slowly, you notice figure, color variations, and grain patterns that deserve showcase placement. This awareness elevates project quality naturally.
For hobbyists following latest woodworking trends toward sustainability and mindful making, hand tools align perfectly with these values. They consume no electricity, generate minimal waste, and encourage deliberate craftsmanship over rushed production.
Step by Step Guidance for Beginners to Start Hand Tool Woodworking
Starting your hand tool journey requires a logical sequence that builds confidence through small successes. These actionable steps move you from raw beginner to competent practitioner systematically.
-
Learn Each Tool’s Function Individually: Spend one week with your hand saw practicing straight cuts on scrap wood. The following week, focus entirely on plane setup and use. This focused approach builds competency faster than trying to learn everything simultaneously. Understand how to sharpen and adjust each tool before attempting projects.
-
Practice Fundamental Cuts and Shapes Daily: Dedicate 20 to 30 minutes daily to basic exercises. Cut straight lines, plane boards flat, chisel square corners. Repetition builds muscle memory that makes techniques automatic. Keep a practice board specifically for testing cuts before attempting them on project wood.
-
Start With Simple Projects That Teach Key Skills: Build a small box as your first project. This teaches measuring, sawing, planing, and basic joinery without overwhelming complexity. Progress to a simple stool next, adding leg joinery skills. Each project should introduce one or two new techniques while reinforcing previous skills. Review beginner woodworking tips guide for suitable starter projects.
-
Establish Regular Tool Maintenance Routines: Sharpen plane irons and chisels every few hours of use. Wax plane soles monthly to reduce friction. Check saw teeth periodically and learn basic sharpening. Clean and oil tools before storage. Proper maintenance prevents frustration from dull edges and ensures tools remain accurate. Well maintained tools perform better and last decades.
-
Use Detailed Plans to Guide Your Progress: Following proven plans eliminates guesswork about dimensions and joinery methods. Check resources on using woodworking plans to understand how plans accelerate learning. As confidence grows, explore wood project design tips for creating your own designs.
-
Join Online Communities for Feedback and Support: Share your work progress in hand tool forums. Experienced woodworkers offer specific suggestions for improving technique. Watching others’ projects provides inspiration and reveals common problem solutions. This community connection prevents isolation and maintains motivation.
Pro Tip: Keep a woodworking journal documenting what works and what doesn’t. Note grain direction challenges, successful joint fits, and tools needing adjustment. This reference becomes invaluable as you progress to complex projects.
Progress gradually to more complex projects as skills solidify. A box teaches basic skills. A stool adds structural joinery. A small table introduces larger panels and leg joinery. A chest of drawers brings precision fitting. Each project naturally increases complexity while building on previous knowledge.
Expect initial awkwardness. Your first hand cut dovetails will look rough. Your first planed surface might have ridges. This is completely normal. Every master woodworker started with imperfect results. Focus on understanding why mistakes happen rather than achieving perfection immediately. Skill develops through intelligent practice, not innate talent.
Discover Hand Tool Woodworking Plans and Tips at Real Woodwork Plans
Ready to transform your hand tool knowledge into finished projects? Real Woodwork Plans provides comprehensive resources tailored specifically for hand tool beginners. Our free woodworking plans include detailed cut lists, assembly sequences, and technique tips that guide you through each project step.

Explore our extensive library of woodworking tips for beginners covering everything from tool selection to advanced joinery. Each guide breaks down complex skills into manageable steps with clear explanations. Whether you’re building your first box or planning a coffee table, our resources help you work confidently with hand tools.
Discover proven strategies through our guide on using woodworking plans for success that explains how detailed plans accelerate your learning curve and prevent costly mistakes. Start your hand tool woodworking journey today with plans designed specifically for traditional methods and hand tool techniques.
Frequently Asked Questions About Hand Tool Woodworking
What basic tools do I need to start hand tool woodworking?
Beginners should acquire seven to nine essential tools: combination square, marking gauge, hand saw, jack plane, block plane, bench chisels (four sizes), wooden mallet, card scraper, and sharpening stones. This core set handles measuring, cutting, shaping, and smoothing for most beginner projects. Focus on buying quality cutting tools with sharp edges rather than accumulating many mediocre tools.
How long does it take to become proficient with hand tools?
Most beginners develop reliable proficiency after 20 to 40 hours of focused practice with fundamental techniques. Daily 30 minute practice sessions over two to three months build solid muscle memory and confidence. True mastery requires years of experience across diverse projects and wood species. Start with simple projects and progress gradually as coordination and understanding improve.
Is hand tool woodworking suitable for small home workshops?
Hand tools are ideal for small workshops and even apartment spaces. They require minimal storage space, produce little dust, and operate quietly without disturbing neighbors. A small workbench and tool chest accommodate a complete hand tool set easily. The quiet operation and lack of electrical requirements make hand tools perfect for compact living spaces.
Can beginners achieve professional quality results using hand tools?
Beginners can absolutely achieve professional quality results with hand tools through patient practice and attention to technique. Hand tools often produce superior surface finishes compared to power tools when properly sharpened and used. The key is managing expectations during the learning phase and focusing on skill development rather than speed. Quality results come from sharp tools, proper technique, and careful work.
How should I maintain and sharpen my hand tools?
Sharpen plane irons and chisels every 30 to 45 minutes of active use on waterstones or diamond plates. Progress through coarse, medium, and fine grits to achieve razor sharp edges. Wax plane soles monthly to reduce friction. Store tools in a dry environment and apply light oil to prevent rust. Clean sawdust from moving parts regularly. Proper maintenance extends tool life decades and ensures consistent performance.
Recommended
- Woodworking Tips for Beginners: Build Skills Step-by-Step
- Master Your Woodworking Project Workflow for DIY Success
- Top 7 Woodworking.great-site.net Alternatives in 2026
- Real Woodwork Plans – Free Woodworking Plans

“DIY woodworking enthusiast who started with zero experience and a YouTube tutorial.
I build simple, practical projects for my home and share free plans
so other beginners can skip the guesswork.If I can build it, you can too.”