
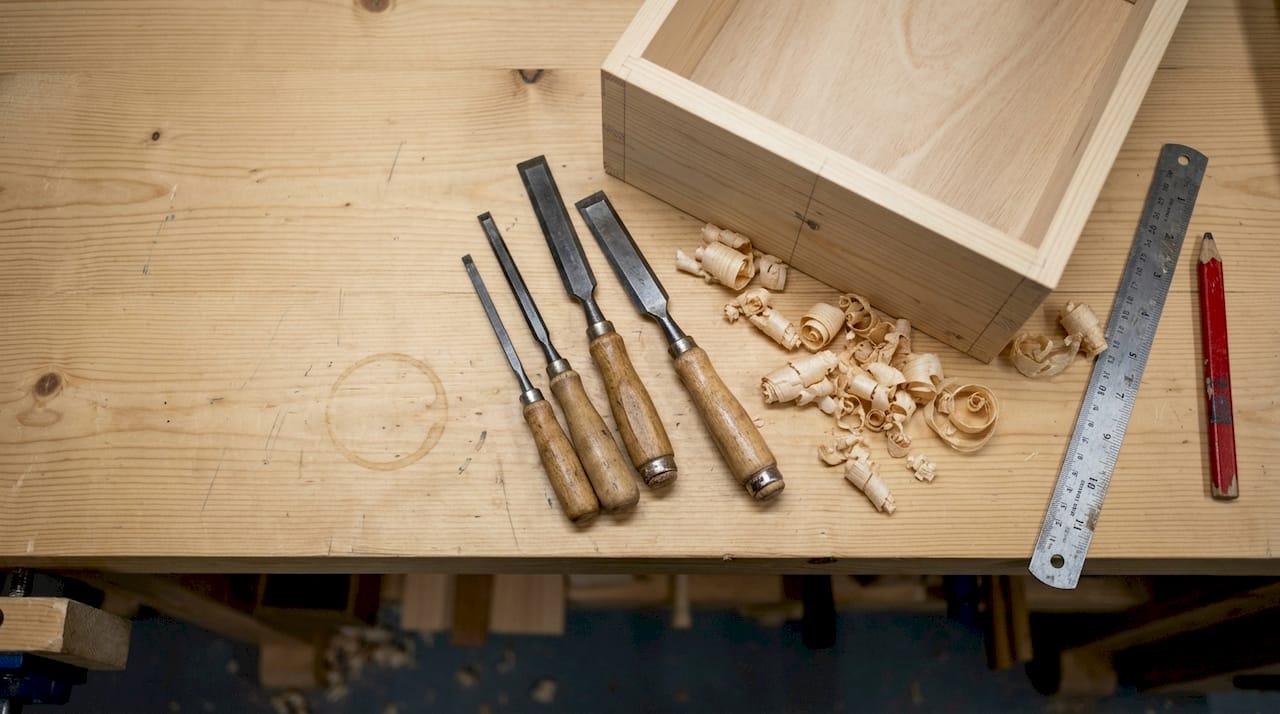
Every woodworker remembers the first time a perfectly sharpened chisel sliced through wood grain like butter. Yet many beginners overlook chisels, viewing them as secondary tools when they’re actually essential for precision joinery and detailed craftsmanship. You’ll discover the fundamental chisel types, master safe cutting techniques, learn proper sharpening angles, and understand how these versatile tools transform ordinary projects into professional-quality work. Whether you’re cutting dovetails or cleaning mortises, chisels give you control that power tools simply cannot match.
Table of Contents
- Key takeaways
- Understanding the essential role of chisels in woodworking
- Types of chisels every beginner should know
- Mastering chisel techniques: strokes, safety, and sharpening
- Common challenges and expert tips for woodworking chisels
- Enhance your woodworking projects with expert plans and tips
- Frequently asked questions
Key Takeaways
| Point | Details |
|---|---|
| Chisels for precision joinery | Chisels give tactile control and precision that power tools cannot match for shaping, paring, and cleaning joints. |
| Beginner chisel types | Bevel edge, bench, mortise, and paring chisels cover most tasks beginners face, from rough stock removal to precise fitting. |
| Technique and safety | Mastering safe cutting techniques and proper sharpening angles is essential for best results. |
| Sharpening affects edge life | Angles and bevel geometry determine how long a sharp edge lasts and how cleanly you cut. |
Understanding the essential role of chisels in woodworking
Chisels serve as precision instruments that give you control no router or saw can replicate. These hand tools excel at shaping, carving, paring, chopping, and cleaning joints, making them indispensable for detailed work. When you need to fit a tenon perfectly or clean out a dado groove, chisels provide the tactile feedback and finesse required for professional results.
The real magic happens in joinery applications. Dovetail joints require chisels to remove waste between pins and tails with surgical precision. Mortise and tenon connections depend on chisels to square corners and refine fit. Even simple butt joints benefit from chisel work when you need to pare surfaces flush or remove glue squeeze-out. Understanding joinery techniques explained in 7 essential methods helps you recognize where chisels become irreplaceable.
Beginner woodworkers often underestimate how frequently they’ll reach for chisels. You’ll use them to chamfer edges, create decorative details, fit hardware mortises, and correct cutting mistakes. Projects ranging from simple boxes to complex furniture demand chisel work at multiple stages. The versatility extends beyond joinery into carving, shaping curved surfaces, and creating custom profiles that distinguish handcrafted pieces from mass-produced items.
“A sharp chisel in skilled hands transforms wood with precision that machines cannot match, making it the cornerstone of fine woodworking craftsmanship.”
Mastering chisels opens creative possibilities across all skill levels. Beginners gain confidence tackling detailed projects while experienced woodworkers rely on chisels for finishing touches that elevate work quality. The investment in understanding proper chisel use pays dividends in every project you complete.
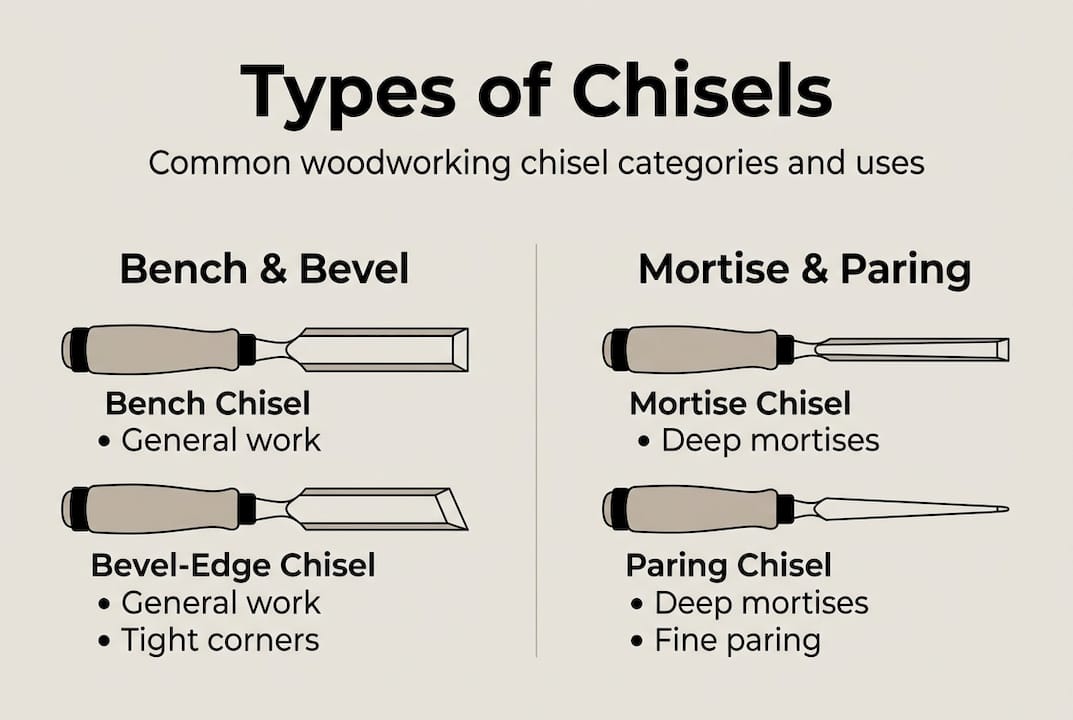
Types of chisels every beginner should know
Selecting the right chisel type for your task dramatically impacts results and ease of work. Four primary categories serve different functions, and understanding their distinctions helps you build an effective starter set. Key types for beginners include bench, bevel-edge, mortise, and paring chisels with sizes from 1/4 inch to 1 inch covering most projects.
Bench chisels represent the workhorse category for general woodworking. These versatile tools handle light chopping, paring, and joint cleanup with equal competence. Their balanced design tolerates both hand pressure and light mallet strikes, making them ideal for everyday tasks. Most woodworkers start with a bench chisel set in 1/4 inch, 1/2 inch, 3/4 inch, and 1 inch widths to cover common project requirements.
Bevel-edge chisels feature angled sides that access tight corners and dovetail joints where square-edged tools cannot reach. The beveled edges reduce weight while maintaining strength, creating a nimble tool perfect for detailed joinery. When fitting drawer fronts or cleaning between dovetail pins, bevel-edge chisels become essential. Their refined design makes them favorites for furniture makers and cabinetry work.
| Chisel Type | Primary Use | Typical Sizes | Best Material |
|---|---|---|---|
| Bench | General purpose chopping and paring | 1/4"–1" | Chrome vanadium steel |
| Bevel-edge | Detailed joinery and corners | 1/4"–3/4" | High-carbon steel |
| Mortise | Heavy chopping for mortises | 1/4"–1/2" | High-carbon steel |
| Paring | Delicate hand-pressure work | 1/2"–1" | Tool steel |
Mortise chisels tackle the heavy-duty work of chopping deep mortises for traditional joinery. Their thick, robust blades withstand repeated mallet strikes without bending or chipping. The square edges and reinforced construction make them purpose-built for removing waste wood in confined spaces. While specialized, mortise chisels prove invaluable when building furniture with mortise and tenon construction.
Paring chisels feature long, thin blades designed exclusively for hand-pressure cutting. Never strike these delicate tools with mallets, as they’re engineered for controlled slicing and fine-tuning joint fit. The extended blade length provides excellent control when shaving thin layers or working on assembled projects. Paring chisels excel at fitting parts and achieving glass-smooth surfaces.
Pro Tip: Start with a quality 4-piece bench chisel set in chrome vanadium steel before investing in specialized types. This foundational collection handles 80% of beginner projects while you develop skills and identify which specialized chisels your work style demands. Check the comprehensive woodworking tools checklist for DIY projects in 2026 to prioritize tool purchases effectively.
Mastering chisel techniques: strokes, safety, and sharpening
Proper technique separates clean, controlled cuts from dangerous, sloppy work that damages both wood and tools. Two fundamental strokes form the foundation of chisel work, each serving distinct purposes. The paring stroke uses light bevel-down pressure while chopping stroke requires mallet-driven force, and understanding when to apply each prevents common mistakes.
Paring involves pushing the chisel with hand pressure alone, keeping the bevel facing down against the work surface. This technique removes thin shavings for fitting joints or smoothing surfaces. Position your body behind the tool with your dominant hand on the handle and your other hand guiding the blade. Apply steady, controlled pressure while keeping hands behind the cutting edge at all times. Paring works best on end grain or when refining previously cut surfaces.
Chopping requires a mallet to drive the chisel through wood fibers, typically when removing waste or creating mortises. Hold the chisel vertically with the bevel facing the waste side, then strike the handle with controlled mallet blows. Start cuts away from layout lines, working progressively closer as you remove material. The chopping technique demands secure workpiece clamping and attention to grain direction to prevent splitting.
- Always clamp your workpiece firmly to prevent movement during cutting
- Position your body and hands so the chisel moves away from you if it slips
- Cut with the grain direction whenever possible to avoid tearout and splitting
- Keep both hands behind the cutting edge throughout every operation
- Maintain sharp edges by honing frequently rather than waiting until dull
- Use appropriate force for the task, never forcing dull tools through wood
Grain direction dramatically affects cut quality and safety. Cutting with the grain produces smooth surfaces as the chisel follows natural wood fibers. Cutting against the grain causes the blade to dig in unpredictably, often splitting wood ahead of your intended cut line. Always examine grain patterns before starting cuts and adjust your approach angle accordingly. For more foundational knowledge, explore woodworking tips for beginners with a step-by-step guide covering essential techniques.
Sharpening maintains the keen edge that makes chisel work safe and enjoyable. A sharp chisel requires less force, reducing fatigue and accident risk while producing cleaner cuts. Establish a 25 to 30 degree bevel angle for general-purpose work using whetstones, honing guides, or sharpening systems. The primary bevel does the cutting while a micro-bevel of 2 to 3 degrees higher strengthens the edge. Hone your chisels whenever you notice increased resistance or torn wood fibers rather than clean shavings.
“Sharp tools are safe tools because they cut predictably with minimal force, while dull edges require dangerous pressure that leads to slips and injuries.”
Pro Tip: Test sharpness by gently slicing a piece of paper held vertically. A properly sharpened chisel cuts cleanly without tearing or requiring sawing motions. This simple test tells you immediately whether your edge needs attention before starting project work. Apply these techniques to beginner woodworking projects for hands-on skill development. Additional guidance on using a chisel properly reinforces safe practices.
Common challenges and expert tips for woodworking chisels
Even experienced woodworkers encounter obstacles when working with chisels, but recognizing common pitfalls helps you avoid frustration and wasted material. Cutting against the grain causes splitting, dull chisels create safety hazards, and tough wood features like knots resist even sharp tools. Understanding these challenges and applying proven solutions elevates your craftsmanship.
Grain direction remains the most frequent source of problems for beginners. When you cut against the grain, the chisel blade follows the path of least resistance, often diving below your intended cut line and splitting wood ahead of the edge. This ruins joints and wastes material. Always study grain patterns before making cuts, adjusting your approach angle or reversing direction when necessary. On figured or irregular grain, take lighter cuts and work more cautiously to maintain control.
Dull chisels force you to apply excessive pressure, dramatically increasing accident risk when the blade suddenly breaks through or slips off target. Beyond safety concerns, dull edges crush wood fibers instead of slicing them cleanly, leaving fuzzy surfaces that require extensive sanding. Maintain sharpness by honing edges every 20 to 30 minutes of active use rather than waiting until performance noticeably degrades. This preventive approach keeps work flowing smoothly.
Knots and dense grain sections challenge even sharp chisels. The compressed, twisted fibers in knots resist cutting and can chip blade edges if you force the issue. When possible, plan joinery to avoid knots entirely. If you must work through knotty areas, take very light cuts and expect slower progress. Sometimes drilling relief holes through knots before chiseling provides an easier path. Patience prevents tool damage and maintains cut quality.
- Never use mallets with paring chisels designed only for hand pressure
- Secure workpieces with clamps rather than holding them by hand
- Keep your free hand behind the cutting direction to avoid injury
- Work incrementally toward layout lines rather than attempting full-depth cuts
- Store chisels properly to protect edges from damage between uses
- Invest in quality tools that hold edges longer and perform more reliably
Pro Tip: When working difficult grain or tight spaces, warm your chisel blade slightly by holding it briefly in your hands. The minor temperature increase helps the steel glide through wood fibers more easily, particularly in dense hardwoods. This old-timer trick reduces effort and improves cut quality without any special equipment. Build comprehensive skills through essential woodworking skills for beginner DIY furniture projects.
Body positioning and workspace setup prevent many common accidents. Stand with stable footing and position work at comfortable height so you’re not reaching awkwardly or working at odd angles. Good lighting helps you see grain direction and layout lines clearly. Keep your bench organized with tools within easy reach but not cluttering the immediate work area. These simple environmental factors dramatically impact both safety and result quality.
Enhance your woodworking projects with expert plans and tips
Mastering chisel techniques opens doors to countless woodworking possibilities, but having reliable project plans and guidance accelerates your progress significantly. Quality plans eliminate guesswork by providing precise measurements, cut lists, and step-by-step instructions that help you apply your growing skills successfully.

Whether you’re building your first bookshelf or tackling furniture projects, detailed plans prevent costly mistakes and material waste. Discover how woodworking plans boost DIY project success in 2026 by providing clear direction from concept to completion. Beginners especially benefit from structured guidance that builds confidence through achievable milestones.
Comprehensive resources make the difference between frustrating trial-and-error and satisfying progress. Access woodworking tips for beginners with step-by-step guidance that complements your chisel skills with broader woodworking knowledge. Prepare effectively using the woodworking tools checklist for DIY projects in 2026 to ensure you have everything needed before starting. Expert plans transform your chisel mastery into finished projects you’ll proudly display for years.
Frequently asked questions
How do I choose the right chisel size for my project?
Start with chisels ranging from 1/4 inch to 1 inch to cover most woodworking tasks. Match the chisel width to your specific needs: smaller sizes like 1/4 inch and 3/8 inch excel at detailed work and narrow mortises, while 3/4 inch and 1 inch chisels handle wider cuts and general shaping efficiently. For joinery work, select a chisel slightly narrower than your mortise width to allow maneuvering room during cleanup.
What safety measures should I follow when using chisels?
Always secure your workpiece with clamps before making any cuts to prevent movement that causes slips. Keep both hands positioned behind the cutting edge throughout every operation, never placing fingers in the tool’s path. Wear safety goggles to protect your eyes from flying wood chips, especially during chopping operations with mallets. Review the woodworking tools checklist for DIY projects in 2026 for comprehensive safety equipment recommendations.
How often should I sharpen my chisels for best results?
Sharpen your chisels whenever you notice increased cutting resistance or torn wood fibers instead of clean shavings. During active use, plan to hone edges every 20 to 30 minutes to maintain optimal performance. Maintain a 25 to 30 degree bevel angle for general-purpose woodworking, adding a micro-bevel 2 to 3 degrees higher to strengthen the cutting edge and extend time between sharpenings.
Can I use a mallet with all types of chisels?
Use mallets only with chisels designed for striking, specifically bench chisels and mortise chisels built to withstand impact forces. Never strike paring chisels with mallets, as their thin, delicate blades are engineered exclusively for hand-pressure work and will damage easily under mallet blows. Always check manufacturer specifications if you’re uncertain whether a particular chisel tolerates mallet use.
DIY projects:
DIY Wooden Coffee Table
DIY Shoe Rack
Recommended
- Master Your Woodworking Project Workflow for DIY Success
- Woodworking Tips for Beginners: Build Skills Step-by-Step
- Master sanding in woodworking for flawless finishes
- Essential woodworking skills for beginner DIY furniture

“DIY woodworking enthusiast who started with zero experience and a YouTube tutorial.
I build simple, practical projects for my home and share free plans
so other beginners can skip the guesswork.If I can build it, you can too.”