
Most DIY woodworkers treat sanding as a tedious chore to rush through, but this mindset sabotages even the best projects. Proper sanding enhances grain beauty, ensures flawless finishes, and extends wood life, making it the foundation of professional results. This guide reveals essential tools, materials, and techniques that transform your sanding from guesswork into precision craftsmanship, delivering the smooth surfaces and durable finishes your projects deserve.
Table of Contents
- Why Sanding Is Crucial In Woodworking
- Understanding Sanding Materials And Grit Selection
- Comparing Sanding Tools: Belt, Orbital, And Random Orbital Sanders
- Best Practices And Techniques For Effective Sanding
- Discover Woodworking Plans To Master Your Finishing Skills
- Frequently Asked Questions
Key takeaways
| Point | Details |
|---|---|
| Sanding prepares surfaces | Creates smooth foundation for finishes to adhere properly and last longer |
| Grit progression matters | Start coarse for material removal, progress to fine grits for smooth results |
| Tool selection impacts quality | Belt sanders remove stock fast, random orbital sanders deliver swirl-free finishes |
| Technique prevents mistakes | Consistent pressure, proper grit sequence, and cleaning between steps avoid scratches |
Why sanding is crucial in woodworking
Sanding removes surface imperfections, smooths uneven areas, and prepares wood to accept finishes uniformly. Without proper sanding, even expensive stains and topcoats look blotchy and unprofessional. The process refines wood grain, eliminates mill marks, and creates the foundation for color evenness across your entire project.
Skipping sanding steps or rushing through them produces visible scratches that telegraph through finishes. Uneven surfaces cause stains to absorb inconsistently, creating dark and light patches that ruin aesthetics. Sanding enhances the natural beauty of the grain, ensures a flawless finish, and extends the life of the wood by allowing protective coatings to bond effectively.
Proper sanding also shapes wood subtly, rounding sharp edges and smoothing transitions between surfaces. This attention to detail separates amateur work from professional craftsmanship. When you invest time in methodical sanding, you create surfaces that feel as good as they look, inviting touch and showcasing your skill.
The consequences of poor sanding extend beyond appearance. Rough surfaces trap dirt and moisture, accelerating wood degradation. Finishes applied over inadequate sanding peel prematurely because they lack proper mechanical grip. Understanding wood finishing benefits starts with recognizing that surface preparation determines long-term durability.
Sanding transforms raw lumber into refined surfaces ready for finishing, making it the most critical preparation step in woodworking.
Consider sanding an investment in your project’s future. Each grit progression removes previous scratches while creating finer ones, building toward glass-smooth results. This systematic approach ensures finishes penetrate evenly, colors develop richly, and protective layers bond permanently. Rushing this process guarantees disappointment, while patience delivers professional outcomes.
Understanding sanding materials and grit selection
Sandpaper grit numbers indicate abrasive particle density per square inch. Lower numbers like 40 to 60 remove material aggressively but leave deep scratches. Higher numbers from 150 to 320 create progressively smoother surfaces ideal for final preparation before finishing. Sandpaper grit ranges differ from coarse for material removal to extra-fine for smooth finishes, making grit selection critical for quality results.
Aluminum oxide sandpaper dominates woodworking because it balances durability, cutting speed, and cost effectiveness. This abrasive handles both softwoods and hardwoods efficiently, lasting longer than cheaper alternatives. Silicon carbide works best for wet sanding applications and extremely hard materials, though most DIY projects rarely require it.
Choosing the correct grit progression prevents common mistakes. Starting too fine wastes time because higher grits cannot remove significant material. Jumping grit numbers creates scratches that lower grits cannot eliminate, forcing you to restart the sequence. A typical progression runs 80, 120, 180, then 220 grit for most furniture projects.
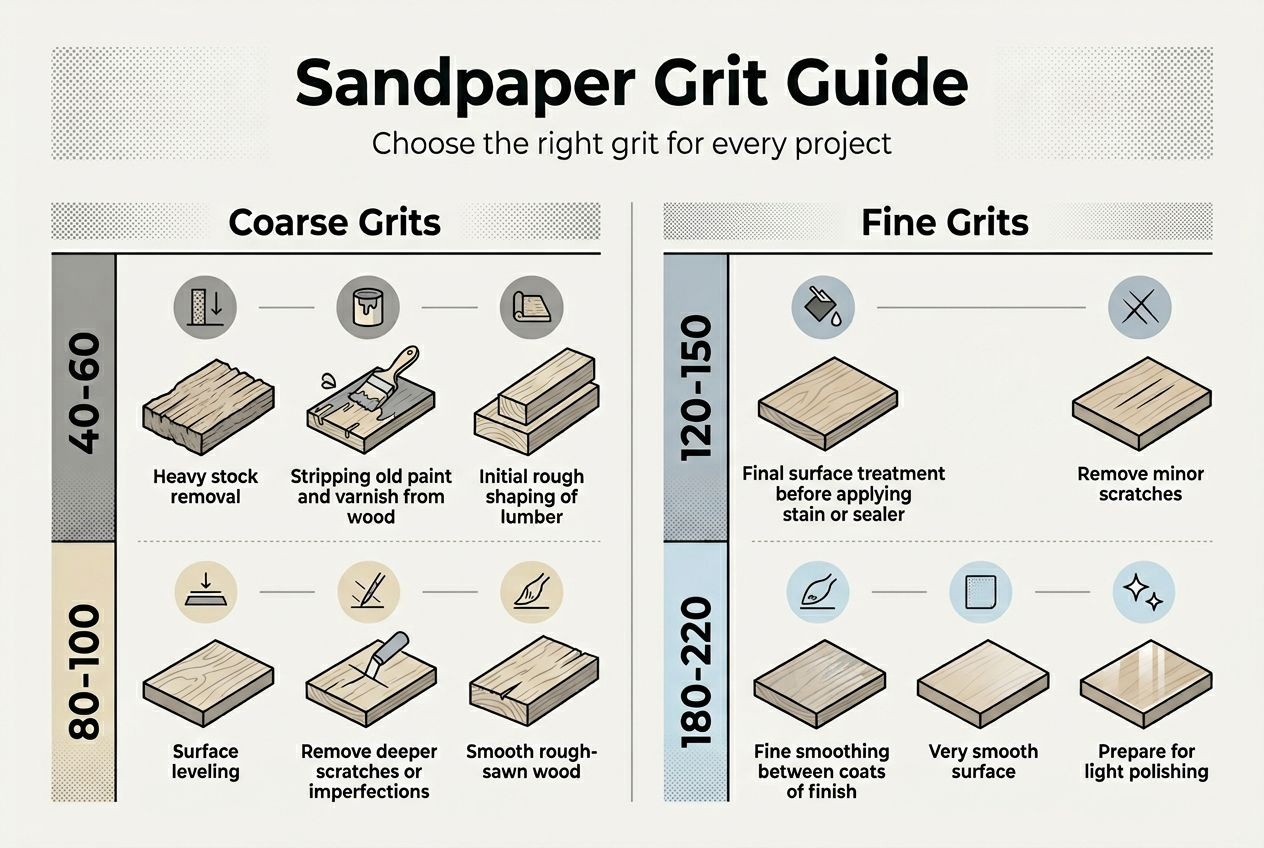
Grit selection guide:
- 40 to 60 grit removes paint, shapes wood, eliminates deep scratches
- 80 to 100 grit smooths rough surfaces after initial shaping
- 120 to 150 grit prepares surfaces for staining or sealing
- 180 to 220 grit creates final smoothness before finish application
- 320+ grit polishes between finish coats for glass-like surfaces
Paper backing also influences performance. Cloth-backed sandpaper resists tearing on power sanders, while paper-backed versions work fine for hand sanding. Stearated (zinc stearate coated) papers resist clogging when sanding softwoods or finishes, extending abrasive life significantly.
Pro Tip: Mark each grit number on your sander’s dust collection port so you never forget which paper you installed, preventing accidental damage from using wrong grits.
Understanding wood selection guidance helps you anticipate sanding needs. Softer woods like pine require gentler grits to avoid gouging, while dense hardwoods tolerate aggressive initial sanding. Matching abrasive to wood species optimizes efficiency and surface quality.
| Grit Range | Primary Use | Surface Result |
|---|---|---|
| 40-60 | Heavy material removal, paint stripping | Very rough, visible scratches |
| 80-100 | Smoothing after shaping, removing mill marks | Moderate smoothness |
| 120-150 | Pre-finish preparation, general smoothing | Fine surface ready for stain |
| 180-220 | Final sanding before topcoat | Very smooth, minimal visible scratches |
| 320+ | Between finish coats, polishing | Glass-smooth surface |
Investing in quality sandpaper pays dividends. Cheap abrasives wear quickly, shed grit particles, and produce inconsistent results. Premium papers cut faster, last longer, and deliver superior surface quality, actually saving money over time through reduced material waste and better outcomes.
Comparing sanding tools: belt, orbital, and random orbital sanders
Belt sanders remove material faster than any other power sander, making them ideal for initial stock removal on flat surfaces. The continuous abrasive belt spins at high speed, cutting aggressively to level uneven boards or strip old finishes. However, belt sanders remove material aggressively but risk gouging if handled improperly, requiring careful handling and experience.

Orbital sanders move sandpaper in small circular patterns, creating random scratch marks less visible than belt sander tracks. These tools excel at general purpose sanding where speed matters more than absolute finish quality. Their square or rectangular pads reach into corners better than round sanders, though the circular motion can leave subtle swirl marks under certain lighting.
Random orbital sanders combine circular pad rotation with simultaneous orbital movement, producing scratch patterns so random they become invisible. Random orbital sanders provide swirl-free finishes ideal for contoured work like guitar necks, making them the preferred choice for final sanding before finishing. Their round pads work beautifully on curved surfaces and flat areas alike.
Using belt sanders first for heavy material removal, then switching to random orbital sanders for final smoothing, creates an efficient workflow. This hybrid approach leverages each tool’s strengths while minimizing weaknesses. Belt sanders handle the grunt work quickly, while random orbital sanders deliver the refined surface finishes demand.
Power sander comparison:
- Belt sanders: fastest material removal, best for flat surfaces, requires skill to avoid damage
- Orbital sanders: good general purpose tool, moderate speed, visible swirl marks possible
- Random orbital sanders: best finish quality, works on curves and flats, slower material removal
- Detail sanders: reaches tight corners, minimal material removal, perfect for intricate work
| Sander Type | Material Removal Speed | Finish Quality | Best Applications |
|---|---|---|---|
| Belt | Very fast | Rough to moderate | Leveling, paint removal, initial smoothing |
| Orbital | Moderate | Good | General sanding, flat surfaces |
| Random Orbital | Moderate to slow | Excellent | Final finishing, curved surfaces |
| Detail | Slow | Good | Corners, intricate shapes, tight spaces |
Pro Tip: Always move belt sanders continuously along the wood grain direction to prevent cross-grain scratches that show through finishes.
Pressure application differs dramatically between sander types. Pushing too hard on random orbital sanders slows orbit causing scratches; belt sanders cut faster with more pressure, requiring opposite handling techniques. Random orbital sanders work best with light, guiding pressure, while belt sanders need firm downward force for efficient cutting.
Understanding hand sanding tools explained complements power tool knowledge. Hand sanding blocks provide control power tools cannot match, especially for final smoothing and detail work. Combining power and hand methods delivers superior results faster than relying on either approach alone.
Matching the right sander to each project phase maximizes efficiency while delivering professional surface quality.
Invest in quality dust collection for any power sander. Airborne wood dust damages lungs permanently, while dust buildup on sandpaper reduces cutting efficiency. Good dust extraction keeps your workspace clean, protects your health, and extends sandpaper life significantly.
Best practices and techniques for effective sanding
Begin every project with coarse grit for shaping and major imperfection removal, then progress systematically to finer grits. Skipping grit numbers leaves scratches that finer papers cannot eliminate, forcing you to restart the entire sequence. A methodical progression from 80 to 120 to 180 to 220 grit produces consistently excellent results.
- Secure workpieces firmly with clamps to prevent movement during sanding
- Start with the coarsest grit needed for your specific situation
- Sand with the grain direction to minimize visible scratches
- Progress to the next finer grit only after removing all previous scratches
- Clean surfaces thoroughly between grit changes using compressed air or tack cloth
- Inspect under angled lighting to reveal hidden scratches before proceeding
- Finish edges and details by hand for precision and control
- Apply final grit sanding immediately before finishing to prevent dust settling
Clamping prevents workpiece movement that causes uneven sanding and potential injury. Unstable boards can shift unexpectedly under sander pressure, creating gouges or catching edges. Proper clamping also frees both hands to control the sander, improving results and safety simultaneously.
Pressure application varies by sander type and project phase. Let random orbital sanders do the work with minimal downward force, while belt sanders require moderate pressure for efficient cutting. Excessive pressure overheats sandpaper, loads it with debris, and can burn wood surfaces, reducing quality.
Checking surfaces between grits prevents wasted effort. Angled lighting reveals scratches invisible under direct illumination, showing exactly where more sanding is needed. Skipping or rushing sanding steps leads to disappointing outcomes and scratches showing through finishes, making inspection time well spent.
Critical sanding mistakes to avoid:
- Sanding across the grain creates deep scratches that telegraph through finishes
- Skipping grit progressions leaves coarse scratches finer grits cannot remove
- Ignoring dust buildup clogs sandpaper and reduces cutting efficiency
- Applying excessive pressure burns wood and loads sandpaper prematurely
- Forgetting edge sanding leaves sharp corners that feel unfinished
Cleaning between grits removes debris that can scratch surfaces during subsequent sanding. Compressed air blows dust from grain pores, while tack cloths capture fine particles regular brushing misses. This simple step dramatically improves finish adhesion and appearance.
Pro Tip: Dampen wood lightly with water after 180 grit sanding, let dry completely, then sand again with 220 grit to eliminate raised grain fibers before finishing.
Hand sanding completes what power tools cannot reach. Edges, inside corners, and intricate details demand the precision only hand sanding provides. Wrapping sandpaper around blocks ensures even pressure distribution, preventing rounded edges and maintaining crisp lines.
Patience separates amateur results from professional quality. Rushing through grits or applying excessive pressure creates more problems than it solves. Methodical progression with proper technique delivers surfaces that showcase your craftsmanship and make finishes perform beautifully. Understanding beginner woodworking mistakes helps you avoid common sanding pitfalls that compromise project quality.
Discover woodworking plans to master your finishing skills
Applying these sanding techniques becomes easier when you follow structured project plans designed for skill development. Our comprehensive woodworking plans guide you through proper surface preparation, ensuring your sanding efforts produce professional results every time.

Explore free woodworking plans that incorporate proper sanding sequences into each project phase, building your skills systematically. Access detailed woodworking tips for beginners that align sanding best practices with overall project success, eliminating guesswork from your workflow.
Discover how woodworking plans boost success by providing clear guidance on when to sand, which grits to use, and how surface preparation impacts final appearance. Structured plans remove uncertainty, letting you focus on craftsmanship rather than troubleshooting mistakes.
Frequently asked questions
What grit sandpaper should I start with for rough wood?
Start with 80 grit for most rough sawn lumber to remove mill marks and surface irregularities efficiently. Use 60 grit only for severely damaged wood or heavy paint removal. Progress to 120 grit after eliminating all visible defects from the initial sanding.
Can I use a belt sander on curved or delicate surfaces?
Belt sanders are unsuitable for curved or delicate surfaces because their aggressive cutting action gouges easily and cannot follow contours. Random orbital sanders or hand sanding with flexible backing pads work far better for intricate shapes. Reserve belt sanders exclusively for flat surface work where their speed advantage matters.
How does sanding affect wood finish durability?
Proper sanding creates microscopic surface texture that allows finishes to grip mechanically, forming strong bonds that resist peeling. Inadequate sanding leaves surfaces too smooth for finish adhesion or too rough for even penetration. Either extreme causes premature finish failure through poor bonding or uneven wear patterns.
Should I sand between finish coats?
Sanding between finish coats with 320 grit or finer removes dust nibs and creates mechanical tooth for subsequent layers to grip. This step ensures smooth final surfaces and strong interlayer bonding. Skip sanding only if applying next coat within the recoat window specified by finish manufacturer.
Recommended
- Master Your Woodworking Project Workflow for DIY Success
- Why Finish Wood: Protecting and Enhancing Projects
- Woodworking Tips for Beginners: Build Skills Step-by-Step
- Essential woodworking skills for beginner DIY furniture

“DIY woodworking enthusiast who started with zero experience and a YouTube tutorial.
I build simple, practical projects for my home and share free plans
so other beginners can skip the guesswork.If I can build it, you can too.”