TL;DR:
- Accurate measurement relies on choosing and maintaining the right tools for each project.
- Common woodworking tools include tape measures, combination squares, try squares, rulers, and story sticks.
- Regular calibration and proper care ensure long-lasting accuracy in measurement tools.
Getting your measurements wrong in woodworking doesn’t just mean a slightly crooked shelf. It means wasted lumber, wasted time, and a project you’d rather not show anyone. For beginners and hobbyists especially, the gap between a clean, professional result and a frustrating rebuild often comes down to one thing: using the right measuring tool correctly. This guide walks you through how to pick, check, and use the core measuring tools every woodworker needs, from basic tape measures to story sticks. Whether you’re cutting your first board or tackling a complex furniture build, accurate measurement is the foundation everything else rests on.
Table of Contents
- How to choose the right woodworking measuring tools
- The must-have measuring tools for woodworking
- Comparison of common woodworking measuring tools
- Care, calibration, and troubleshooting for measuring tools
- A seasoned woodworker’s perspective: What really matters in measuring
- Take your woodworking projects further with expert resources
- Frequently asked questions
Key Takeaways
| Point | Details |
|---|---|
| Choose for accuracy | Select measuring tools based on precision needs for each project. |
| Tool maintenance matters | Regular calibration and care prevent errors that can ruin your work. |
| Use the right tool | Match the tool—tape measure, square, ruler—to the specific woodworking task. |
| Small errors add up | Even a tiny inaccuracy in measuring can multiply into major project issues. |
How to choose the right woodworking measuring tools
Not all measuring tools are created equal, and buying the wrong one for your project is a mistake most beginners make at least once. The good news is that choosing well doesn’t require spending a fortune. It requires knowing what to look for.
A good measuring tool earns its place in your shop by meeting four criteria: accuracy, readability, build quality, and ease of use. Accuracy is the most obvious one, but readability matters more than people expect. A tape with tiny, hard-to-read markings will cause errors just as surely as a poorly made one. Build quality determines how long a tool stays accurate, and ease of use affects whether you’ll actually reach for it consistently.
Tool calibration is something beginners almost always skip, and it’s one of the costliest habits to develop. A tape measure that’s been dropped or a square that’s been knocked around can drift out of spec without any visible damage. Before trusting any tool on a new project, test it. Check your key tool checklist to make sure you’re starting every build with reliable equipment.
Project type also changes what you need. Rough carpentry, like framing or building a workbench, tolerates a bit more variation. Fine joinery, like dovetails or fitted cabinet doors, demands tighter tolerances and more precise tools. Using a rough-carpentry tape for a fine joinery project is like using a kitchen knife for surgery. It might technically work, but the results won’t be pretty. Pairing the right tools with techniques like using jigs for precision gives you a real accuracy advantage.
Here’s a quick checklist for evaluating any measuring tool before you buy:
- Markings are clear and easy to read in low light
- The tool feels solid, not flimsy or hollow
- Moving parts (like a tape hook) have intentional, controlled play
- The tool is appropriate for your most common project type
- You can verify its accuracy with a simple test
Pro Tip: Always test a tape measure’s hook before trusting it. The hook moves about 1/16 inch to compensate for inside and outside measurements. If it moves more or less than that, your readings will be off.
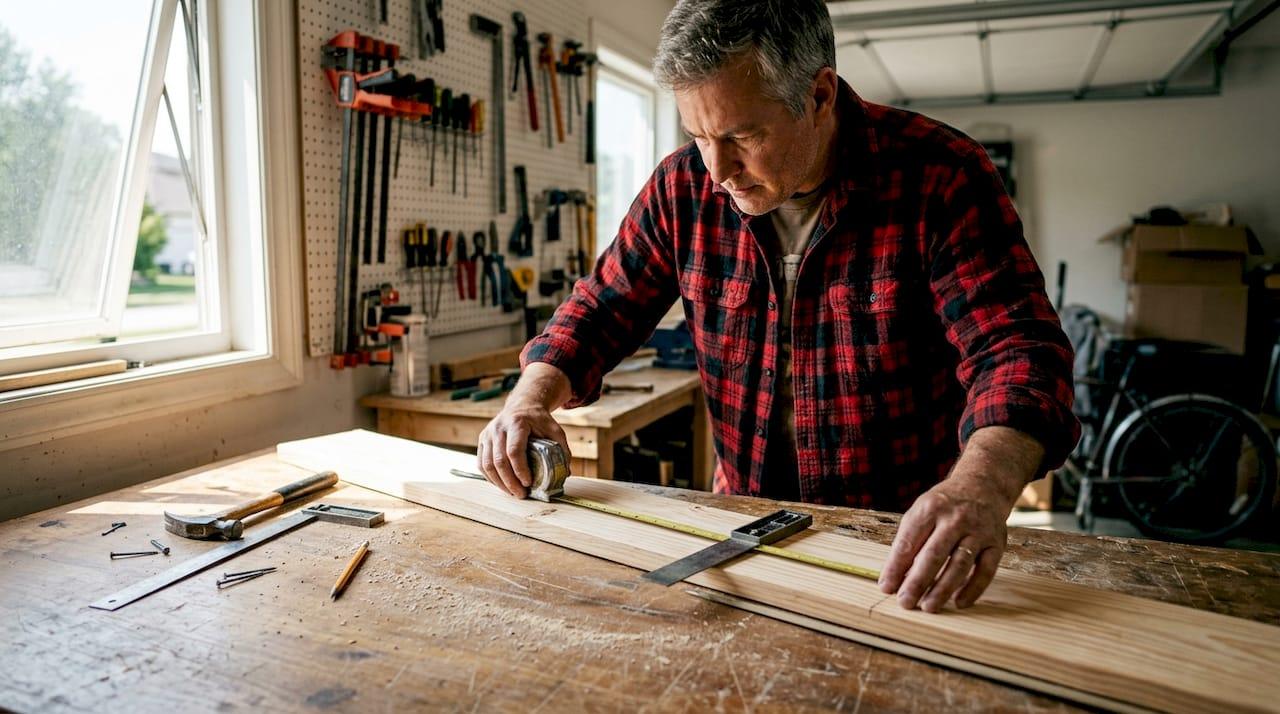
The must-have measuring tools for woodworking
With selection criteria in mind, here are the tools every woodworker should know and use. Each one has a specific job, and knowing when to reach for which one separates confident woodworkers from frustrated ones.
- Tape measure: Your go-to for general lengths and rough layout. Fast, portable, and versatile. Best for measuring boards, room dimensions, and initial cuts.
- Combination square: Adjustable and multi-purpose. Marks 90 and 45-degree angles, checks depth, and scribes lines. A workhorse for layout work.
- Try square: Fixed at 90 degrees and built for one job: checking and marking right angles. Simpler than a combination square, but often more reliable for that single task.
- Ruler or straight edge: Short, rigid, and precise. Use it for marking fine lines, checking flatness, and measuring small distances where a tape would flex too much.
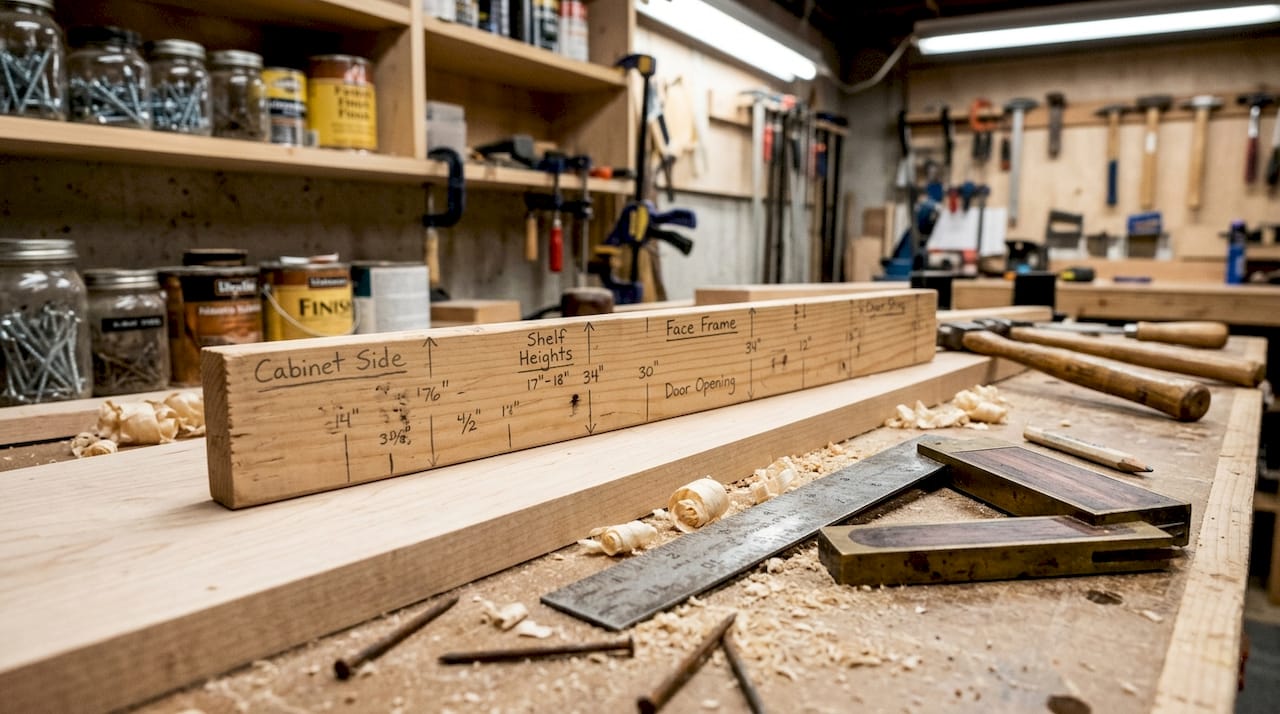
- Story stick: A custom measuring rod you make yourself. Mark repeated measurements directly on a stick of wood and transfer them without re-measuring. Eliminates cumulative error on repeated cuts.
The tape and square use combination covers the vast majority of what you’ll need for most beginner and intermediate projects. But knowing the limits of each tool keeps you out of trouble.
Square accuracy is where budget tools really show their limits. Pro-grade squares hold tolerances under 0.001 inch, while basic models can deviate up to 0.005 inch. That difference sounds tiny, but across a 24-inch panel, it adds up to visible error. For fine furniture work, it matters enormously. Building essential measuring skills around verified, accurate tools is what separates clean results from constant re-cuts.
Here’s when to use each tool:
- Tape measure: Initial board selection, rough cuts, room or opening measurements
- Combination square: Layout lines, checking miters, setting depth on a router or chisel
- Try square: Confirming 90-degree corners, checking board ends after crosscuts
- Ruler: Marking joints, measuring small parts, checking flatness of glued panels
- Story stick: Repeated parts, cabinet carcasses, any job where you’re making multiple identical cuts
Comparison of common woodworking measuring tools
Now that the main measuring tools are covered, here’s a clear side-by-side comparison to help you decide which to use and when.
| Tool | Typical accuracy | Best project type | Approx. cost | Durability |
|---|---|---|---|---|
| Tape measure | ±1/32 inch | General, rough carpentry | $10 to $40 | Moderate |
| Combination square | 0.001 to 0.005 inch | Layout, joinery, furniture | $20 to $120 | High |
| Try square | 0.001 to 0.005 inch | Right angle checks | $15 to $80 | Very high |
| Ruler/straight edge | ±0.005 inch | Fine layout, small parts | $8 to $30 | Very high |
| Story stick | User-dependent | Repetitive cuts, cabinets | Under $5 (DIY) | High |
The accuracy gap between brands is real and measurable. Starrett squares hold 0.001 inch tolerance while Stanley models sit closer to 0.005 inch. For rough carpentry, that difference won’t matter. For a fitted drawer or a mortise-and-tenon joint, it absolutely will.
Cost doesn’t always predict quality, but it’s a reasonable signal. A $15 combination square from a discount bin is unlikely to hold up to the accuracy demands of fine joinery. A mid-range option from a reputable brand, verified with a machinist square or feeler gauge, will serve most hobbyists well for years.
The story stick deserves more credit than it usually gets. It costs almost nothing, you make it yourself from a scrap of wood, and it eliminates one of the most common sources of error in woodworking: re-measuring the same dimension multiple times and getting slightly different numbers each time. Understanding how wood type effects your measurements, especially with seasonal expansion and contraction, makes the story stick even more valuable on longer projects.
Durability is another underrated factor. Metal rulers and try squares last decades if you don’t drop them. Tape measures are the most vulnerable to damage because the hook gets bent and the blade gets kinked. Buy a decent one, treat it carefully, and replace it when the hook shows any sign of bending.
Care, calibration, and troubleshooting for measuring tools
Finally, even the best tools are only as good as their maintenance. Proper care and occasional calibration ensure lasting accuracy.
Most woodworkers trust their tools until something goes obviously wrong. That’s backwards. Tools drift out of calibration gradually, and by the time you notice the error, you may have already cut several boards wrong. A simple monthly check takes five minutes and catches problems early.
Here’s a practical maintenance routine:
- Squares: Use the reverse test. Draw a line against the square, flip it 180 degrees, and check if the blade aligns with the line. Any gap means it’s out of square.
- Tape measures: Inspect the hook for bending after any drop. A bent hook throws off every measurement you take.
- Rulers: Check for warping by holding them against a known flat surface like a piece of glass.
- Story sticks: Re-verify marks if the stick has been exposed to moisture, since wood moves.
Pro Tip: Worn tape hooks and dropped squares are the two most common sources of hidden measurement error. A quick monthly calibration check catches both before they ruin a project.
“The most overlooked calibration issue isn’t a broken tool. It’s a tool that’s slightly wrong and still feels fine in your hand. A square that’s off by 0.003 inch won’t feel different, but it will show up in every joint you cut.”
Troubleshooting is straightforward once you know what to look for. If your joints aren’t closing cleanly, check your square first. If your boards are coming out slightly short or long, check your tape hook. If repeated cuts are inconsistent, switch to a story stick. Most accuracy problems trace back to one of these three sources, and avoiding common mistakes starts with knowing where to look.
Store your tools properly too. Keep squares in a case or hung on a wall where they won’t get knocked around. Retract tape measures fully before storing them. A little care goes a long way toward keeping your tools accurate for years.
A seasoned woodworker’s perspective: What really matters in measuring
Here’s something most tool reviews won’t tell you: the woodworkers who produce the cleanest, most consistent work rarely have the most tools. They have a few well-chosen ones they trust completely, and they check them regularly.
Beginners tend to over-invest in tools and under-invest in habits. A $200 combination square used carelessly will produce worse results than a $40 one that gets verified before every project. The tool doesn’t make the measurement. Your process does.
The real skill in measuring isn’t reading a tape. It’s developing a workflow for precision that you repeat every single time: mark, measure, check, cut. Never skip the check. The woodworkers who consistently hit tight tolerances aren’t more talented. They’re more disciplined.
One truth that surprises most beginners: tool accuracy is lost faster from neglect than from heavy use. A square used daily by a careful woodworker will stay accurate longer than one stored in a drawer and dropped once. Treat your measuring tools like the precision instruments they are, and they’ll reward you with years of reliable service.
Take your woodworking projects further with expert resources
Knowing your tools is only half the equation. The other half is having a solid plan to work from.

At Real Woodwork Plans, we pair accurate measurement guidance with detailed, beginner-friendly project plans that tell you exactly what to cut, where, and how. When you combine the tool knowledge from this guide with woodworking plans for better outcomes, your success rate goes up dramatically. Explore our step-by-step skill building resources to keep developing your craft, and discover the health and savings benefits that come with building your own furniture. Your next project is closer than you think.
Frequently asked questions
How do I check if my tape measure is accurate?
Mark a board end with your tape, then flip the hook and re-measure from the inside. The hook should move 1/16 inch to account for both inside and outside readings. Any more or less and your tape is off.
How often should I calibrate my woodworking measuring tools?
Run a reverse test on your squares monthly and inspect tape hooks after any drop. Squares lose accuracy when dropped, so a quick monthly check prevents errors from sneaking into your work.
What’s the difference between a combination square and a try square?
A combination square adjusts and measures both 90 and 45-degree angles, making it more versatile. A try square is fixed at 90 degrees, and accuracy verified by flipping and checking overlap makes it a reliable dedicated right-angle tool.
Can cheap measuring tools work for fine woodworking?
Budget tools handle rough carpentry fine, but fine woodworking needs tighter tolerances. Pro squares hold 0.001 inch while budget models can drift to 0.005 inch, which is enough to ruin a fitted joint.
Recommended
- Master Your Woodworking Project Workflow for DIY Success
- Woodworking tools checklist for DIY projects in 2026
- Woodworking Tips for Beginners: Build Skills Step-by-Step
- Essential woodworking skills for beginner DIY furniture
- 7 Essential Shutter Installation Tools Every Home Needs | Shutter World

“DIY woodworking enthusiast who started with zero experience and a YouTube tutorial.
I build simple, practical projects for my home and share free plans
so other beginners can skip the guesswork.If I can build it, you can too.”