
TL;DR:
- Beginners should focus on simple, reliable woods like pine, poplar, or plywood to ensure success.
- Mastering accurate measuring, dry fitting, and basic joinery are essential for building sturdy furniture.
- Using clear plans and practicing core skills routinely builds confidence and improves woodworking progress.
Starting your first furniture project can feel like standing at a crossroads with no map. You’re staring at lumber racks, scrolling through tool lists, and second-guessing every decision before you’ve even made a single cut. The good news is that most beginners face the exact same confusion, and it has nothing to do with talent. It has everything to do with not having a clear starting point. This guide cuts through that noise. You’ll find practical, straightforward tips on choosing materials, measuring accurately, joining pieces together, and finishing your work so it actually looks good. Stick with these fundamentals and your first project will be something you’re proud to show off.
Strong furniture starts with strong joints—learn the fundamentals in our guide to what joinery is and why it matters.
Table of Contents
- Choose beginner-friendly materials
- Master essential measuring and cutting skills
- Simple joinery methods you can trust
- Project workflow: plan, assemble, and finish with confidence
- Great starter projects and common beginner mistakes
- Why simple, repeatable methods matter more than fancy tools
- Your next steps: unlock success with free woodworking plans
- Frequently asked questions
Key Takeaways
| Point | Details |
|---|---|
| Start with simple materials | Choose woods that are easy to cut and assemble for less frustration. |
| Measure carefully | Exact measuring and marking are essential for parts that fit together cleanly. |
| Use basic joinery | Select straightforward joints like butt joints or pocket holes for early projects. |
| Follow a consistent process | A clear step-by-step workflow prevents rushed mistakes and builds confidence. |
| Learn from small projects | Starting with simple builds helps you avoid pitfalls and develop core skills. |
Choose beginner-friendly materials
With materials being the foundation of any project, understanding how to select the right ones is step one. Walk into any lumber yard and the sheer number of options can stop you cold. But here’s the truth: most beginner projects only need a handful of reliable, affordable woods to succeed.
The types of wood for furniture that work best for beginners are plywood, pine, and poplar. Plywood offers excellent stability because it resists warping better than solid boards. Pine is cheap, widely available, and easy to cut and sand. Poplar is slightly harder than pine but still very forgiving, and it takes paint beautifully. As a beginner, beginner-friendly woods like these give you the best shot at a clean, successful build.
Understanding what qualifies as furniture grade wood matters too. Furniture grade simply means the board is smooth, straight, and free of major defects like large knots or splits. It costs a little more but saves a lot of frustration.
| Wood type | Avg. cost per board foot | Workability | Best use |
|---|---|---|---|
| Pine | Low | Very easy | Tables, shelves, benches |
| Poplar | Low to medium | Easy | Painted furniture, frames |
| Plywood | Medium | Easy (with right blade) | Cabinets, flat panels |
| Oak | High | Moderate | Accent pieces, tabletops |
Avoid exotic hardwoods like teak or walnut until you have several projects under your belt. They’re expensive, harder to cut, and less forgiving of mistakes. Also avoid any board that looks twisted or bowed on the rack.
Pro Tip: At the store, hold each board at eye level and sight down its length. Any curve or twist you see there will only cause problems once you’re building.
Here are the most common material mistakes beginners make:
- Buying warped or cupped boards because they look fine lying flat
- Choosing exotic hardwoods to “make it look nice” before mastering basic cuts
- Skipping furniture grade material to save a few dollars, then regretting the rough surface
- Not buying 10 to 15 percent extra material to account for mistakes and waste
- Ignoring wood moisture content, which causes boards to shrink or swell after assembly
Master essential measuring and cutting skills
Once you’ve selected good materials, mastering measurement and cutting is the next essential skill. This is where most beginner projects either come together or fall apart. The difference between a wobbly table and a solid one often comes down to a single off measurement.
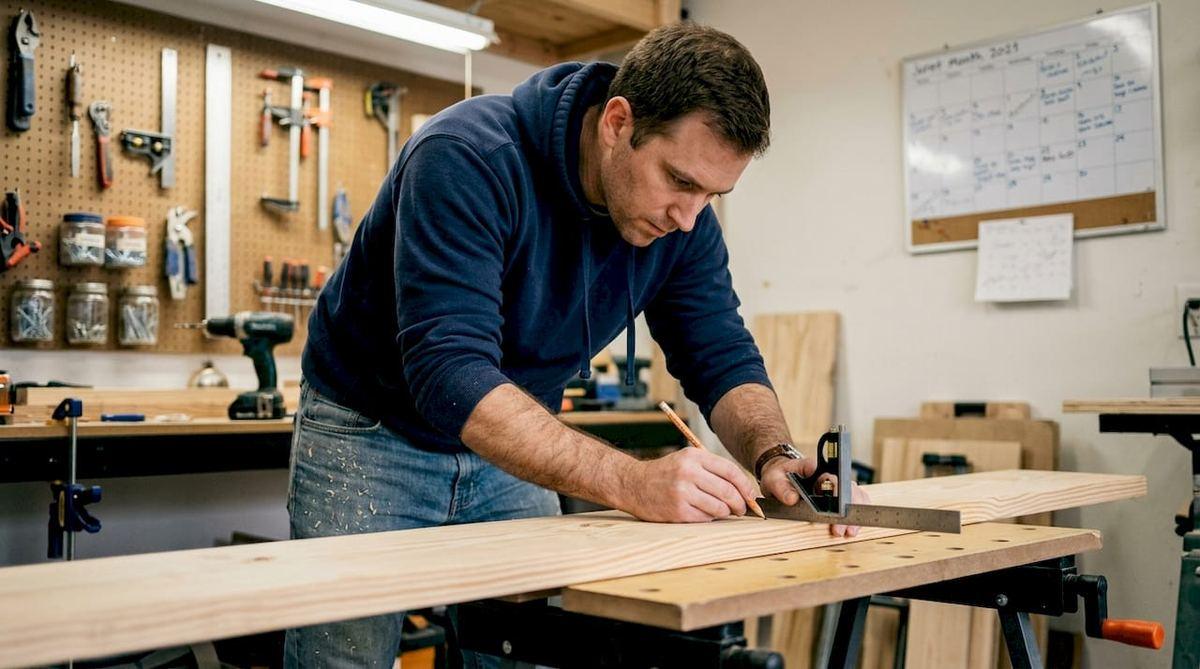
The golden rule is simple: measure twice, cut once. It sounds obvious, but under the excitement of starting a project, it’s easy to rush. Every cut you make is permanent. A board that’s too short cannot be fixed.
Here’s a reliable sequence to follow every time you measure and cut:
- Read your plan carefully and write down every dimension before touching any wood
- Mark your cut line with a sharp pencil, not a marker (pencil lines are thinner and more precise)
- Use a speed square or combination square to confirm the line is perfectly perpendicular
- Double-check the measurement one more time before cutting
- Cut on the waste side of the line, not through it
- After cutting, test the piece against your plan dimensions before moving on
Accurate measuring is the single biggest factor separating a frustrating build from a satisfying one. Get this right and everything else becomes easier.
Drilling pilot holes before driving screws is another skill beginners often skip. Pilot holes prevent wood from splitting, especially near the ends of boards. They also make driving screws much easier and keep everything aligned.
Pro Tip: Always mark with a sharp pencil and confirm your line is square before cutting. A combination square costs under $15 and prevents countless errors.
For more detailed guidance on building these core skills, the step-by-step woodworking tips at Real Wood Work Plans walk you through each technique clearly.
Simple joinery methods you can trust
Armed with accurate cuts, connecting your pieces securely with the right joints is the next challenge. Joinery is the art of holding two pieces of wood together, and it does not need to be complicated to be strong.
For beginners, two methods stand above the rest. Butt joints with screws and glue are the simplest option: you press two pieces face to face or end to face and fasten them. Pocket holes use a special jig to drill angled holes that accept screws, creating a hidden, strong connection. Both methods are fast, reliable, and require minimal tools.
Here are the joinery methods worth knowing as a beginner:
- Butt joint: Two pieces joined at their flat faces with screws and wood glue. Simple and strong enough for most furniture.
- Pocket hole joint: Uses a pocket hole jig to create hidden angled screws. Great for face frames and table aprons.
- Dowel joint: Wooden pegs align and reinforce two pieces. Moderate difficulty but very clean looking.
- Biscuit joint: Uses an oval-shaped wooden biscuit in matching slots. Good for aligning panels.
Avoid dovetails and mortise and tenon joints for now. They require precision tools, significant practice, and a lot of patience. They’re worth learning eventually, but not on your first build.
| Joint type | Strength | Difficulty | Tools needed |
|---|---|---|---|
| Butt joint | Moderate | Very easy | Drill, screws, glue |
| Pocket hole | Strong | Easy | Pocket hole jig |
| Dowel | Moderate | Moderate | Drill, dowel jig |
| Dovetail | Very strong | Hard | Chisels, saw, experience |
For a deeper look at your options, basic joinery techniques covers seven methods with clear explanations. When gluing, always apply an even coat to both surfaces, clamp firmly, and wait the full cure time before moving on. Rushing the glue-up is one of the most common reasons joints fail. Stronger furniture joinery starts with patience at this stage.
Project workflow: plan, assemble, and finish with confidence
Having learned sturdy joints, now it’s time to wrap it all into a foolproof workflow. A clear process keeps you from making decisions under pressure and helps you catch problems before they become permanent.
Follow this sequence for every project:
- Sketch your design and write out every dimension
- Create a cut list so you know exactly what pieces you need
- Buy materials with 10 to 15 percent extra for mistakes
- Cut all pieces before assembling anything
- Dry fit all parts without glue or screws to check for fit
- Make any adjustments, then assemble in stages with glue and fasteners
- Sand all surfaces starting with 80 grit, then 120, then 180 or 220 grit
- Apply your first thin coat of finish and let it dry completely
- Lightly sand with 220 grit between coats, then apply a second coat
The dry fit step is critical. Dry fitting before assembly lets you spot gaps, misalignments, and fit problems while you can still fix them easily.
Pro Tip: Always dry fit your parts before adding any glue. Once glue is involved, you have very little time to make corrections.
Common mistakes at each stage:
- Planning: Skipping a cut list and buying the wrong amounts
- Cutting: Not labeling pieces, causing confusion during assembly
- Assembly: Rushing past the dry fit and discovering gaps too late
- Sanding: Skipping grits, which leaves visible scratches under the finish
- Finishing: Applying thick coats that drip, bubble, or take forever to dry
For smooth sanding techniques that make a real difference, always sand with the grain, never across it. Cross-grain scratches show up clearly under any stain or clear coat. Thin coats and patience are the secret to flawless wood finishes that look professional even on a first build.
Great starter projects and common beginner mistakes
With a process in place, let’s look at what to build first and how to avoid stumbling blocks. The best first project is one that teaches core skills without overwhelming you with complexity.
These starter projects build real confidence:
- Simple coffee table: Four legs, a top, and basic joinery. Great for practicing measuring and assembly.
- Wooden bench: Teaches you about structural strength and long cuts.
- Floating shelf: Minimal materials, quick build, and immediately useful in your home.
- Step stool: Small scale means less material cost if something goes wrong.
- Side table: Introduces apron joinery and leg attachment techniques.
Start small. A shelf or stool teaches you more than a complex bookcase ever could at this stage. Each project sharpens your eye and your hands.
Now for the mistakes. Common pitfalls that trip up nearly every beginner include inaccurate measuring, ignoring wood grain direction, skipping sanding steps, rushing the finish, and not accounting for wood movement. Wood expands and contracts with humidity changes. If you glue a wide panel together without allowing for movement, it can crack over time.
For more guidance on avoiding beginner mistakes, the Real Wood Work Plans beginner project guide walks you through the most common errors and exactly how to sidestep them.
Research consistently shows that measuring errors account for the majority of wasted material in beginner woodworking projects. Getting your measurements right from the start is not just good practice; it directly affects how much money you spend.
Why simple, repeatable methods matter more than fancy tools
Here’s a perspective worth sitting with: most beginners believe that buying better tools will make them better woodworkers. A fancier saw, a new router, a premium sander. It feels logical. But rapid growth actually comes from repeating the basics until they become second nature.
Consistent measuring, clean cuts, and patient finishing beat a $500 tool setup every time on beginner projects. The woodworkers who improve fastest are not the ones with the biggest tool budgets. They’re the ones who pick one project, build it, learn from what went wrong, and build it again slightly better.
Imperfect projects teach you more than perfect plans ever could. That wobbly shelf shows you exactly where your measuring went off. That blotchy finish tells you to sand more carefully next time. Treat every mistake as data, not failure.
Focus on building core woodworking skills with whatever tools you already have. Once those skills are solid, upgrading your tools will actually make a difference. Until then, the tool that needs the most practice is your eye and your patience.
Your next steps: unlock success with free woodworking plans
Now that you know what works, here’s how to take your workshop from ideas to reality without reinventing the wheel.
At Real Wood Work Plans, you’ll find free woodworking plans designed specifically for beginners, with cut lists, diagrams, and step-by-step instructions that take the guesswork out of your first build. Following a proven plan means you spend less time second-guessing and more time actually building. For ongoing learning, the more beginner woodworking tips section covers everything from tool selection to finishing techniques in plain language. Whether you’re building a coffee table or a simple shelf, starting with a solid plan makes every step feel manageable and keeps your confidence growing with every project.
Frequently asked questions
What are the best types of wood for beginner furniture projects?
Pine, poplar, and plywood are affordable, easy to work with, and widely recommended for beginners because they cut cleanly, sand well, and accept most finishes without much fuss.
Which joinery method is easiest for a first project?
Butt joints with screws or glue and pocket holes are the simplest and most beginner-friendly options, requiring minimal tools and delivering reliable strength for most starter furniture.
What is the most common mistake beginners make when building furniture?
Inaccurate measuring and skipping key steps like sanding and dry fitting cause the most beginner frustrations, often resulting in gaps, uneven surfaces, and pieces that don’t fit together properly.
How should I finish my first furniture piece for best results?
Sand all surfaces with the grain moving from coarser to finer grits, then apply thin finish coats and let each one dry completely before adding the next for a smooth, professional result.
Recommended
- Woodworking Tips for Beginners: Build Skills Step-by-Step
- Step-by-step woodworking guide: build with confidence
- Building Beginner Woodworking Projects: 60% Avoid Mistakes
- Furniture Making Terminology: Key Concepts for DIY Success

“DIY woodworking enthusiast who started with zero experience and a YouTube tutorial.
I build simple, practical projects for my home and share free plans
so other beginners can skip the guesswork.If I can build it, you can too.”