
You measure twice, cut once, apply glue, and clamp your project together. Hours later, you unclamp your work only to find gaps, misalignment, or worse, a joint that falls apart when you pick it up. Weak wooden joints ruin otherwise beautiful projects and waste your time and materials. This guide teaches you the essential skills to create strong, professional-looking joints that transform your DIY woodworking from frustrating experiments into durable, attractive pieces you’ll be proud to display or gift.
Table of Contents
- Understanding Types Of Wooden Joints And Their Uses
- Tools, Materials, And Preparation For Making Wooden Joints
- Step-By-Step Guide: Making Strong And Neat Wooden Joints
- Verifying Joint Strength And Troubleshooting Common Issues
- Explore Woodworking Plans To Enhance Your Diy Projects
- Frequently Asked Questions
Key takeaways
| Point | Details |
|---|---|
| Joint types matter | Butt, mitered butt, and dowel joints each offer different strength and aesthetic benefits for various projects. |
| Proper preparation is essential | Selecting the right wood, tools, dowels, and glue ensures joints hold together under stress and look clean. |
| Technique determines durability | Precise drilling, proper glue application, and adequate clamping pressure create joints that last for years. |
| Testing prevents future failure | Learning to verify joint strength and troubleshoot common issues improves your skills and project outcomes. |
Understanding types of wooden joints and their uses
Choosing the right joint for your project determines whether your furniture wobbles after a month or stands strong for decades. Each joint type balances ease of construction with structural integrity and visual appeal.
Butt joints are the most basic type of wood joint and are not strong unless supported by additional fasteners. You simply place two pieces of wood end to end or edge to face, then secure them with glue, screws, or nails. While quick to make, butt joints rely entirely on mechanical fasteners for strength because end grain doesn’t bond well with glue alone. They work fine for non-structural applications like simple boxes or backing panels where appearance matters less than assembly speed.
Mitered butt joints are similar to basic butt joints but offer a more finished look by hiding end grain. You cut both pieces at matching angles, typically 45 degrees, so the joint forms a clean corner without visible end grain. Picture frames and decorative trim use mitered joints because they create seamless corners that look professionally crafted. The tradeoff is that mitered joints are even weaker than straight butt joints because you’re joining two angled end grain surfaces, so they need reinforcement with splines, biscuits, or careful nailing.
Dowel joints use hidden dowels for strength and alignment. You drill matching holes in both pieces, insert wooden dowels with glue, and clamp the assembly. The dowels create a mechanical connection that’s far stronger than glue alone while keeping the joint invisible from the outside. Dowel joints work beautifully for chairs, tables, cabinets, and any project where you want strength without visible hardware. They require more precision than butt joints but deliver professional results that hold up to daily use.
Different projects demand different wood joinery methods based on stress, visibility, and your skill level. A simple bookshelf might use reinforced butt joints, while a dining chair needs dowel joints to withstand years of sitting and movement.

| Joint Type | Strength | Appearance | Typical Uses |
| — | — | — |
| Butt joint | Low without reinforcement | Shows end grain | Simple boxes, backing panels, temporary structures |
| Mitered butt joint | Very low without reinforcement | Hides end grain, clean corners | Picture frames, decorative trim, crown molding |
| Dowel joint | High with proper technique | Invisible connection | Chairs, tables, cabinets, quality furniture |
Pro Tip: Pocket hole screws can transform weak butt joints into surprisingly strong connections. Drill angled holes on the hidden side of your joint, drive pocket screws through one piece into the other, and you get the speed of a butt joint with significantly better holding power for projects like face frames and simple furniture.
Tools, materials, and preparation for making wooden joints
Gathering the right equipment before you start prevents frustrating mistakes and ensures your joints fit tightly and hold strongly.
Essential tools for creating quality wooden joints include a drill with sharp bits matching your dowel sizes, a dowel jig for precise hole alignment, bar clamps or pipe clamps for applying even pressure during glue-up, quality wood glue formulated for interior or exterior use depending on your project, and accurate measuring tools like a combination square and marking gauge. A miter saw or hand saw with a miter box helps cut precise angles for mitered joints. A pocket hole jig is optional but valuable if you plan to reinforce butt joints frequently.
Selecting appropriate wood makes a significant difference in joint strength and longevity. Wood is a renewable, recyclable, lightweight, and biodegradable material with natural beauty and workability, but not all species work equally well for joinery. Hardwoods like oak, maple, and walnut hold dowels and screws better than softwoods like pine or cedar, though softwoods are easier to work and perfectly adequate for many projects. Whatever species you choose, ensure the wood is properly dried to around 6 to 8 percent moisture content for indoor furniture to prevent joints from loosening as the wood shrinks. Understanding wood selection’s role in DIY woodworking helps you match material properties to your project requirements.
Dowel diameter directly impacts joint strength, with larger dowels providing greater resistance to bending and shear forces. Research shows that the bending yield moment increases with dowel diameter, meaning thicker dowels handle more stress before failing. For most furniture joints, 3/8 inch dowels offer an excellent balance of strength and ease of installation. Smaller 1/4 inch dowels work for light-duty applications like drawer construction, while 1/2 inch dowels provide maximum strength for heavy chairs and tables.
| Dowel Diameter | Joint Application | Typical Hole Depth |
|---|---|---|
| 1/4 inch | Drawers, small boxes, light trim | 3/4 to 1 inch per side |
| 3/8 inch | Chairs, tables, cabinet frames, general furniture | 1 to 1.5 inches per side |
| 1/2 inch | Heavy tables, bed frames, high-stress joints | 1.5 to 2 inches per side |
These woodworking tips for beginners emphasize proper preparation because fixing mistakes after glue dries is nearly impossible.
Pro Tip: Always drill pilot holes slightly smaller than your dowel diameter to create a tight friction fit. If dowels slide in too easily, the joint will be weak. If they require excessive force, you risk splitting the wood. A 3/8 inch dowel should fit snugly into a 3/8 inch hole drilled with a sharp bit, requiring moderate hand pressure but not hammer blows.
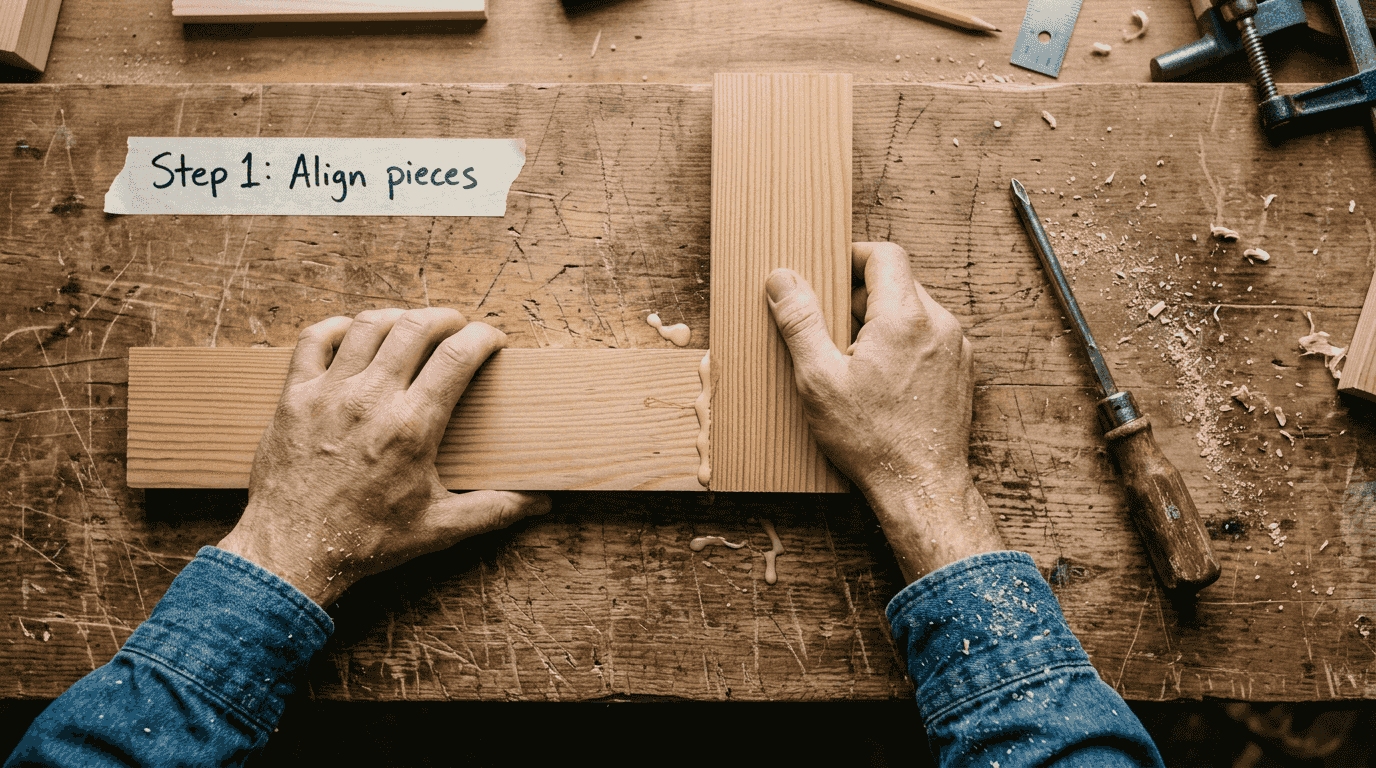
Step-by-step guide: making strong and neat wooden joints
Following a systematic process ensures your joints align perfectly and hold together under stress.
Making a reinforced butt joint:
- Cut both pieces square using a miter saw or hand saw with a square guide.
- Mark the fastener locations on the face piece, spacing screws or pocket holes evenly.
- If using pocket holes, set your jig for your wood thickness and drill angled holes.
- Apply a thin, even layer of wood glue to both mating surfaces.
- Align the pieces carefully and drive screws or pocket hole screws to pull the joint tight.
- Wipe away excess glue immediately with a damp cloth before it dries.
- Allow the glue to cure for at least 30 minutes before handling, or overnight for full strength.
Making a mitered butt joint:
- Set your miter saw to exactly 45 degrees and make test cuts to verify accuracy.
- Cut both pieces to length with mitered ends, ensuring the angles match perfectly.
- Dry fit the pieces to check alignment before applying glue.
- Apply glue sparingly to both mitered surfaces to avoid excessive squeeze-out.
- Bring the pieces together and secure with a corner clamp or band clamp.
- Reinforce with brad nails, splines, or biscuits if the joint will bear any load.
- Clean up glue squeeze-out and let the joint cure completely before removing clamps.
Making a dowel joint:
- Mark the center points for dowel holes on both pieces using a marking gauge for consistency.
- Set up your dowel jig according to the manufacturer’s instructions for your dowel size.
- Clamp the jig firmly to the first piece and drill to the proper depth, typically 1 to 1.5 inches.
- Repeat for all dowel locations on both mating pieces, maintaining perfect alignment.
- Test fit dowels without glue to ensure all holes align and pieces come together flush.
- Apply glue inside the holes and on the dowel surfaces, using enough to coat but not flood.
- Insert dowels into one piece, then bring both pieces together with firm, even pressure.
- Clamp the assembly with bar clamps, applying enough pressure to close gaps without crushing wood.
- Check for square using a combination square and adjust clamps if needed.
- Allow glue to cure according to the manufacturer’s directions, usually 30 minutes to 1 hour for handling.
The dowel acts as a mechanical fastener by bonding with the glue while also helping to align the pieces, creating a connection that’s both strong and precise.
Common pitfalls to avoid:
- Drilling dowel holes at slightly different angles, causing pieces to misalign when assembled
- Using too much glue, which creates hydraulic pressure that prevents pieces from seating fully
- Insufficient clamping pressure, leaving microscopic gaps that weaken the glue bond
- Removing clamps too soon, before the glue reaches handling strength
- Ignoring wood grain direction, which can cause splits as the wood expands and contracts
Expert woodworkers emphasize designing joints that accommodate wood expansion and contraction for long-term durability. Solid wood moves primarily across the grain, so joints connecting pieces with perpendicular grain orientations need special consideration. Tabletops attached to aprons, for example, should use elongated screw holes or figure-eight fasteners that allow the top to move seasonally without cracking.
Learning how to design wood projects with proper joint placement prevents structural problems before you cut your first board. Following a proven woodworking project workflow ensures you complete each step in the right order for best results.
Pro Tip: A small amount of glue squeeze-out indicates proper glue coverage and clamping pressure. If no glue appears at the joint line, you either used too little glue or didn’t clamp tightly enough. Excess squeeze-out means you used too much glue, which wastes material but doesn’t harm the joint. The ideal amount produces a thin bead along the entire joint that you can scrape away after it becomes rubbery but before it fully hardens.
Verifying joint strength and troubleshooting common issues
Testing your joints reveals whether your technique needs adjustment and prevents project failures.
Simple strength tests help you evaluate joint quality without specialized equipment. For dowel joints, try gently twisting the assembled pieces in opposite directions after the glue cures. A properly made joint should feel absolutely solid with no movement or creaking. For butt joints reinforced with screws or pocket holes, apply moderate pressure perpendicular to the joint line. The joint should not flex or show gaps. You can also build a test assembly using scrap wood with the same joint type, then deliberately stress it to failure to understand its limits before committing to your actual project.
Signs of joint failure include visible gaps between pieces, movement or play when you manipulate the assembly, cracking sounds when stress is applied, glue lines that appear starved or incomplete, and pieces that separate with minimal force. Catching these issues early lets you remake the joint before investing more time in finishing and assembly.
Troubleshooting weak joints requires identifying the root cause:
- Loose fit indicates dowel holes drilled too large or dowels that are undersized for the hole
- Poor glue bond suggests contaminated surfaces, insufficient glue, expired adhesive, or inadequate clamping
- Misalignment results from inaccurate hole placement, drilling at inconsistent angles, or failing to use a dowel jig
- Splits near joints occur from drilling too close to edges, using dowels that are too large, or forcing pieces together
- Wood condition problems include excessive moisture causing future shrinkage or dried-out wood that doesn’t absorb glue properly
Wooden dowels and joints must be evaluated for maximum bending moment, shear strength, and embedment strength to ensure mechanical integrity. Understanding these mechanical properties helps you design joints that match your project’s structural requirements.
Common mistakes and their fixes:
- Mistake: Dowels that spin in their holes. Fix: Use fluted or spiral dowels that provide better glue distribution and mechanical grip.
- Mistake: Joints that look strong but fail under load. Fix: Increase dowel diameter, add more dowels, or switch to a stronger joint type for that application.
- Mistake: Visible gaps at the joint line. Fix: Ensure pieces are flat and square before assembly, and apply adequate clamping pressure across the entire joint.
- Mistake: Glue that dries before you finish clamping. Fix: Work faster, use glue with longer open time, or assemble complex projects in stages.
- Mistake: Joints that loosen over time. Fix: Account for wood movement in your design and ensure wood is properly dried before joinery.
Different joinery techniques affect furniture strength in ways that become obvious only after months or years of use. Investing time to master proper technique now prevents disappointment later.
Explore woodworking plans to enhance your DIY projects
Applying these joint-making skills becomes easier and more rewarding when you follow structured plans designed for success. Quality woodworking plans provide detailed measurements, cut lists, and assembly sequences that eliminate guesswork and help you achieve professional results even as a beginner.

Our collection includes projects specifically chosen to help you practice different joint types in real-world applications. Start with simple boxes using reinforced butt joints, progress to picture frames with mitered corners, then tackle furniture pieces that showcase dowel joint construction. Each plan includes tips for joint placement, recommended tools, and techniques to ensure your connections are both strong and attractive. Explore our woodworking tips for beginners to build confidence, discover how woodworking plans boost DIY project success, and browse free woodworking plans to find your next project.
Frequently asked questions
What is the strongest type of wooden joint for beginners?
Dowel joints are stronger than basic butt joints for beginners due to hidden reinforcement and alignment. The dowels create a mechanical connection that resists pulling and twisting forces far better than glue alone. Strength improves significantly with proper glue application and selecting dowel sizes appropriate for your wood thickness and project requirements.
How do I prevent wood from splitting when drilling dowels?
Use a sharp drill bit and a dowel jig for precise holes that maintain consistent depth and angle. Pre-drill pilot holes slightly smaller than your dowel diameter to create a tight fit without excessive force. Clamp pieces firmly during drilling to prevent movement, and avoid drilling too close to board edges where the wood is more likely to split under pressure.
What tools are essential for making wooden joints?
Basic saw, drill, dowel jig, clamps, measuring tools, and wood glue cover most joint-making needs for beginners. A miter saw improves accuracy for angled cuts, while a combination square ensures pieces are perfectly perpendicular. An optional pocket hole jig adds versatility for reinforcing butt joints quickly and effectively. Find more guidance in our woodworking tips for beginners.
Can wooden joints handle wood expansion and contraction?
Design joints with slight slotted mortises or gaps to allow movement perpendicular to the grain direction. Solid wood expands and contracts primarily across the grain with seasonal humidity changes, so joints connecting pieces with perpendicular grain need accommodation for this movement. Proper wood drying and acclimation before jointing helps prevent splits, and expert woodworkers emphasize designing joints to accommodate wood movement for durability.
Recommended
- Woodworking Tips for Beginners: Build Skills Step-by-Step
- Wood joinery methods list: 9 essential DIY techniques
- Role of joinery in furniture: strength and craftsmanship
- What is woodworking: a beginner’s guide to the craft

“DIY woodworking enthusiast who started with zero experience and a YouTube tutorial.
I build simple, practical projects for my home and share free plans
so other beginners can skip the guesswork.If I can build it, you can too.”