That wobbly bookshelf you built last summer? The coffee table that rocks every time someone sets a mug down? Nine times out of ten, the culprit is weak joinery, not bad wood or cheap tools. Wood joinery is the art of connecting two pieces of wood so they hold together under real-world stress, and it’s the single skill that separates furniture that lasts decades from projects that fall apart in months. In this guide, you’ll learn which joints to use, what tools you need, how to cut and fit each joint correctly, and how to test your work before it carries any load.
Table of Contents
- What is wood joinery and why does it matter?
- Essential tools and materials for basic wood joinery
- Step-by-step guide: Making the most common wood joints
- Key tips for strong, accurate joinery
- Testing, troubleshooting, and fixing wood joinery mistakes
- Ready to level up your woodworking? Explore more resources
- Frequently asked questions
Key Takeaways
| Point | Details |
|---|---|
| Strong joints matter | Proper joinery is key to building durable, wobble-free DIY furniture. |
| Use the right tools | Begin with essential hand tools and suitable adhesives for joinery success. |
| Master basic techniques | Learn and practice beginner joints like butt, lap, dowel, biscuit, and mortise and tenon. |
| Prioritize precision | Always dry-fit and clamp your joints to guarantee strength and accuracy. |
| Test and improve | Inspect, troubleshoot, and repair your joints for safe, lasting DIY results. |
What is wood joinery and why does it matter?
Wood joinery is simply the method you use to connect two pieces of wood. Every chair leg, cabinet door, and picture frame relies on at least one type of joint to stay together. Without solid joinery, even the most beautiful wood will split, rack, or loosen over time.
For DIY projects, joinery shows up everywhere:
- Furniture frames: Tables, chairs, and bed frames need joints that resist racking (side-to-side movement).
- Shelving and cabinets: Shelves need joints that handle shear load (weight pushing straight down).
- Boxes and drawers: Corners need joints that resist pulling apart.
- Decorative frames: Picture and mirror frames need neat, tight corners.
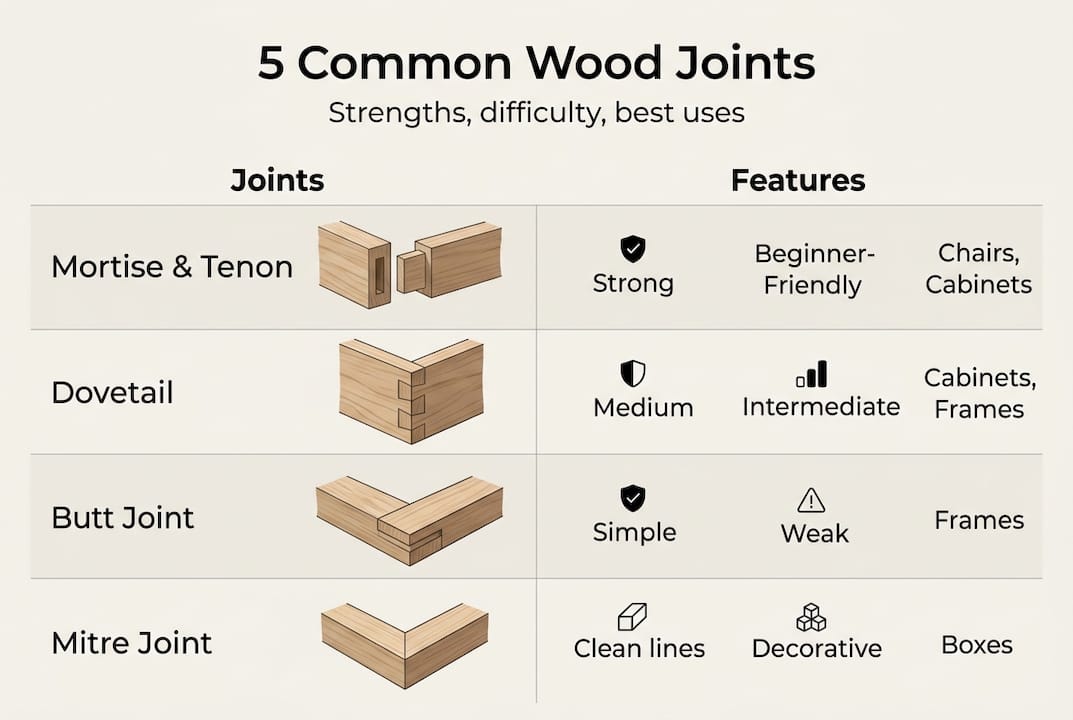
Beginners typically start with five joints: the butt joint, lap joint, dowel joint, biscuit joint, and mortise and tenon. Each has a different strength profile and a different level of difficulty. The joinery technique breakdown on our site walks through all of them in detail, but here’s the key insight: not every project needs the hardest joint.
Worth knowing: The mortise and tenon is considered the strongest traditional joint for frames, tables, and chairs because the tenon fits snugly into the mortise, creating both maximum glue surface and mechanical resistance to movement.
Choosing the right joint for the right job is what smart woodworking looks like. A butt joint with screws is perfectly fine for a utility shelf. A mortise and tenon is worth the extra effort for a dining chair that will take years of daily use.
Essential tools and materials for basic wood joinery
You don’t need a fully equipped shop to cut good joints. A focused set of hand and power tools will cover most beginner projects.
| Tool | Purpose |
|---|---|
| Marking gauge | Scribes precise lines for joint layout |
| Combination square | Checks 90-degree angles and measures depth |
| Chisels (set of 4) | Pares and cleans joint recesses |
| Mallet | Drives chisels without damaging handles |
| Hand saw or circular saw | Cuts joint shoulders and cheeks |
| Drill and bits | Bores holes for dowels and screws |
| Clamps (at least 4) | Holds joints tight during glue-up |
| Router (optional) | Speeds up mortise cutting and dado joints |
For adhesives, PVA wood glue (standard yellow or white glue) works for most joints. Polyurethane glue is stronger and gap-filling, which makes it useful when your fit isn’t perfect. For fasteners, pocket screws and dowels add mechanical strength alongside glue.
When it comes to wood species, start with poplar, pine, or soft maple. They’re affordable, widely available, and forgiving to cut. Hardwoods like oak and walnut are beautiful but less forgiving for beginners. Check out our guide on choosing wood for joinery before you buy your lumber.
Also review our DIY woodworking tools checklist and beginner hand tool essentials to make sure you’re set up before you start cutting.
Pro Tip: Gaps weaken glue bonds significantly. Always dry-fit your joints before applying any adhesive. If pieces don’t slide together smoothly by hand, fix the fit first.
Step-by-step guide: Making the most common wood joints
Here’s a quick comparison of the five joints beginners use most, ranked by strength:
| Joint type | Strength (PSI) | Difficulty | Best use |
|---|---|---|---|
| Mortise and tenon | 3,000–3,500 | Intermediate | Chair legs, table frames |
| Lap joint | 2,200–3,000 | Beginner | Face frames, light structures |
| Dowel joint | 1,800–2,400 | Beginner | Edge joints, cabinet doors |
| Biscuit joint | 1,200–1,800 | Beginner | Panel glue-ups, alignment |
| Butt joint | 600–900 | Beginner | Utility shelves, rough frames |
Strength data sourced from joint PSI testing. Research also shows that polyurethane adhesive outperforms PVA in withdrawal force tests, making it the better choice for stress-prone joints.
How to make a butt joint:
- Cut both pieces square at the joint location.
- Apply PVA glue to one face.
- Press pieces together and clamp.
- Add two screws for mechanical reinforcement.
- Let cure for at least one hour before removing clamps.
How to make a lap joint:
- Mark the overlap area (usually half the board thickness) on both pieces.
- Make a series of saw cuts across the waste area.
- Chisel out the waste to create a flat recess.
- Test the fit, then glue and clamp.
How to make a dowel joint:
- Mark matching hole centers on both pieces using a dowel jig.
- Drill holes to the correct depth (half the dowel length plus 1/8 inch).
- Apply glue inside the holes and on the mating faces.
- Insert dowels, press together, and clamp.
How to make a mortise and tenon:
- Mark the tenon on one piece (typically one-third the board thickness).
- Cut the tenon cheeks and shoulders with a saw.
- Mark and chop the mortise on the mating piece with a chisel.
- Test fit, adjust with a chisel if needed, then glue and clamp.
Pro Tip: Use polyurethane adhesive on mortise and tenon joints in chairs or tables. Its gap-filling properties and superior bond strength make a real difference under daily load.
For more detail on each method, see our step-by-step joint making guide and learn about the strength benefits of joinery for furniture projects.
Key tips for strong, accurate joinery
Making joints is only half the battle. Attention to detail at this stage is what separates strong furniture from shaky results.
Here are the habits that make the biggest difference:
- Always mark a reference face and edge. Pick the flattest, straightest face on each board and mark it with a pencil. All measurements come from this face. This prevents cumulative errors that throw joints out of square.
- Measure twice, cut once. It’s a cliché because it’s true. A 1/16-inch error in a joint shoulder creates a visible gap and a weak bond.
- Use clamps generously. Clamps apply even pressure across the joint while glue cures. Skipping clamps leads to starved joints where glue squeezes out unevenly and the bond is weak in spots.
- Check for square after clamping. Measure diagonally across the assembly. If both diagonal measurements match, you’re square. If not, shift a clamp slightly until they do.
Remember: Precision fitting is essential because gaps weaken glue bonds. Use reference faces and edges consistently, and always clamp during glue-up.
Using a jig is one of the fastest ways to improve accuracy. Our guide on using jigs for accuracy shows you how to build simple shop-made jigs that make repeatable cuts easy. And if you want to understand how joinery affects the overall feel of a finished piece, read about craftsmanship and strength in furniture making.
Pro Tip: If you’re ever unsure whether a joint fits well enough, dry-fit it first. Always. Glue locks in your mistakes permanently.
Testing, troubleshooting, and fixing wood joinery mistakes
Before any joint carries real load, test it. A few simple checks catch problems early, when they’re still easy to fix.
- Tug test. After glue has fully cured (24 hours for PVA), grip both pieces and apply firm pulling force in the direction the joint will be stressed. A good joint won’t budge.
- Tap test. Knock lightly on the joint with your knuckle. A solid joint sounds dense. A hollow or rattling sound means the glue didn’t bond fully.
- Visual inspection. Look for gaps at the joint line. Even a hairline gap means the glue bond is compromised at that point.
- Rack test. For frames and boxes, apply gentle diagonal pressure. Any movement means the joint isn’t resisting racking forces adequately.
If a joint fails these checks, here’s how to fix it:
- Loose fit after drying: Inject fresh PVA or polyurethane glue into the gap using a syringe, clamp tightly, and let cure fully.
- Glue squeeze-out: Let it gel (about 30 minutes), then slice it off cleanly with a chisel. Don’t wipe wet glue, it smears into the grain and blocks stain.
- Structurally weak joint: Add glue blocks (small triangular pieces glued into the interior corner) or drive pocket screws alongside the joint for mechanical backup.
Safety note: Never use a load-bearing joint on furniture, shelving, or structures until it passes all strength checks. Research confirms that joint withdrawal force drops significantly with poor fit and improper adhesive choice.
For more help diagnosing problems in your builds, our troubleshooting woodworking tips page covers the most common beginner mistakes and how to recover from them.
Ready to level up your woodworking? Explore more resources
Solid joinery skills open the door to every project you’ve been putting off. Once you can cut a clean lap joint or a tight mortise and tenon, you can build furniture that genuinely lasts. The next step is putting those skills into a real project with a clear plan.

At realwoodworkplans.com, you’ll find free woodworking plans designed specifically for builders at every level, from first-time hobbyists to experienced makers ready for a challenge. Learn how using woodworking plans can cut your build time, reduce material waste, and give you the confidence to tackle bigger projects. And if you’re still on the fence about DIY, read about the DIY woodworking benefits that go well beyond saving money on furniture.
Frequently asked questions
What is the strongest basic wood joint for beginners?
The mortise and tenon joint is the strongest option, offering maximum glue surface and mechanical strength that makes it ideal for furniture frames, tables, and chairs.
Can I use regular wood glue for all joints?
PVA works well for most joints, but polyurethane adhesive outperforms PVA in withdrawal force tests, so use it on any joint that will face regular stress or heavy loads.
What’s the biggest mistake beginners make in wood joinery?
Leaving gaps is the most common error. Gaps weaken glue bonds significantly, so always make precise cuts and dry-fit every joint before applying adhesive.
How do I repair a loose joint after glue has dried?
Inject fresh glue into the gap using a syringe, add thin wood shims if the gap is large, clamp tightly, and allow a full 24-hour cure before putting the piece back into use.
Recommended
- Joinery techniques explained: 7 essential methods for DIY
- How to make wooden joints: beginner’s guide in 2026
- Wood joinery methods list: 9 essential DIY techniques
- Role of joinery in furniture: strength and craftsmanship

“DIY woodworking enthusiast who started with zero experience and a YouTube tutorial.
I build simple, practical projects for my home and share free plans
so other beginners can skip the guesswork.If I can build it, you can too.”