
Most DIYers spend hours choosing wood species and stain colors, yet overlook the single factor that determines how easily their project cuts, sands, and finishes: wood grain. Understanding grain characteristics transforms frustrating builds into smooth, professional results. This guide breaks down grain types, explains how they affect every stage of woodworking, and gives you a practical framework for selecting and working with wood grain to elevate your furniture making and DIY craftsmanship.
Table of Contents
- What is wood grain?
- Types of wood grain: open vs. closed
- How wood grain affects finishing and staining
- Choosing the right wood grain for your project
- Tips for working with wood grain
- Next steps for woodworking success
- Frequently asked questions
Key Takeaways
| Point | Details |
|---|---|
| Wood grain basics | Understanding grain helps you choose the best wood for your DIY project. |
| Open vs. closed grain | Open grain needs filler for smooth finishes, while closed grain is prone to blotching. |
| Finishing impact | Grain type affects stain and finish results, so always test before you commit. |
| Practical selection | Match grain characteristics to your project’s needs for durability and beauty. |
What is wood grain?
Wood grain refers to the direction, size, and arrangement of fibers and pores running through lumber. These patterns form as trees grow, with each annual ring creating distinct lines and textures. When mills cut boards, the sawing method (plain sawn, quarter sawn, or rift sawn) determines which grain patterns become visible on the board’s surface.
The visual and tactile characteristics you see and feel directly impact how wood behaves during every woodworking operation. Grain direction affects whether your saw blade cuts cleanly or tears fibers. It determines if sandpaper smooths the surface or creates scratches. It controls how stain penetrates and whether finish coats lay flat or raise fuzzy fibers.
Understanding wood milling basics helps you predict grain behavior before you start cutting. Plain sawn boards show cathedral patterns with grain running at various angles. Quarter sawn lumber displays straight, parallel grain lines that provide superior stability. Each cut reveals different grain characteristics that influence your project’s workability and final appearance.
Pro Tip: Always observe grain direction before starting any cut or finish. Run your hand across the surface to feel which way fibers lay smoothest, then work in that direction to minimize tear-out and improve results.
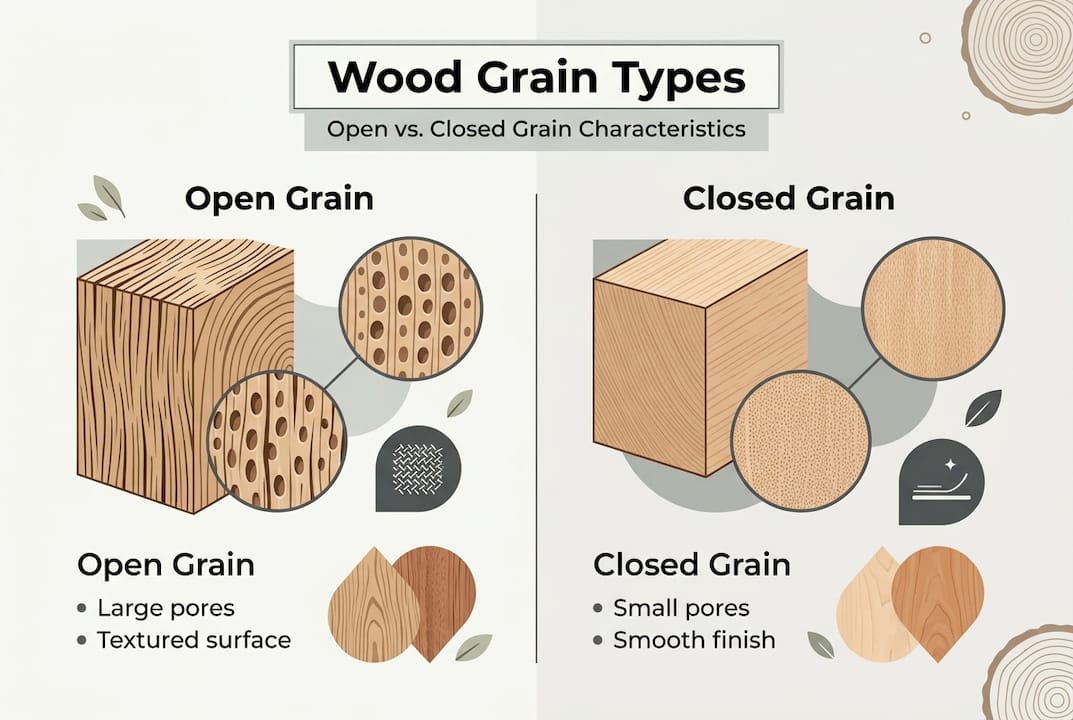
Types of wood grain: open vs. closed
Wood species fall into two main grain categories based on pore size and density. Open grain woods have large visible pores that create pronounced texture you can see and feel. Oak, ash, walnut, and mahogany exemplify this category. Their pores act like tiny tubes running through the wood, creating distinct patterns and affecting how materials absorb into the surface.
Closed grain woods feature tiny, densely packed pores that produce smooth surfaces with subtle texture. Maple, cherry, birch, and poplar represent this group. Their fine pore structure creates different working properties and finishing characteristics compared to open grain species.

| Characteristic | Open Grain | Closed Grain |
|---|---|---|
| Pore Size | Large, visible | Tiny, barely visible |
| Surface Feel | Textured, pronounced | Smooth, uniform |
| Common Species | Oak, ash, walnut | Maple, cherry, birch |
| Stain Absorption | Deep, even penetration | Surface level, potential blotching |
| Filler Required | Yes, for smooth finish | No |
| Durability | Excellent impact resistance | Good, but less forgiving |
Choosing between grain types depends on your project requirements and desired aesthetic:
- Select open grain for rustic furniture, statement pieces, or projects where pronounced texture adds character
- Choose closed grain for smooth tabletops, painted projects, or pieces requiring fine detail work
- Consider open grain for outdoor furniture due to superior durability and weather resistance
- Pick closed grain when you want subtle wood figure without competing visual texture
- Use open grain for projects with natural or oil finishes that highlight wood character
Understanding these differences helps you match wood types for your project to your specific needs. Open grain woods require grain filler before applying glossy finishes if you want a glass-smooth surface. Without filler, pores remain visible and tactile even under multiple finish coats. Closed grain species achieve smooth finishes more easily but demand careful stain application to avoid blotching. Knowing which furniture wood options suit your project saves time, materials, and frustration.
How wood grain affects finishing and staining
Grain type fundamentally changes how wood accepts stains and finishes. Stain absorption varies dramatically between open and closed grain species, creating different challenges and opportunities for achieving your desired appearance.
Follow these steps to test grain behavior before committing to your finishing schedule:
- Cut a test piece from your project wood, ensuring it matches the same grain orientation
- Sand the test piece to your planned final grit (typically 150 to 220)
- Apply your chosen stain or finish to half the test piece
- Wait the recommended drying time, then apply a second coat
- Compare the test results to your expectations and adjust your approach accordingly
Closed grain woods present blotching challenges because dense areas absorb less stain than softer grain sections. Cherry and maple notoriously create splotchy, uneven color without proper preparation. Wood conditioner solves this problem by partially sealing the surface, allowing more uniform stain penetration. Apply conditioner 15 minutes before staining, following manufacturer instructions for your specific product.
Water-based finishes cause grain raising in all wood types. Moisture swells wood fibers, creating a fuzzy surface texture that feels rough after the first coat dries. Professional wood finishing tips include raising grain intentionally before finishing. Wipe the bare wood with a damp cloth, let it dry completely, then sand with your final grit. This process removes fibers that would otherwise rise during finish application.
Pro Tip: For open grain woods, always use a filler before final finish for a professional look. Apply grain filler across the grain using a putty knife or squeegee, forcing paste into pores. Scrape excess filler off immediately, working diagonally to grain direction. After drying, sand lightly and apply your topcoat for a perfectly smooth surface.
“Understanding grain characteristics before finishing prevents 90% of common DIY finishing problems. The wood tells you what it needs if you know how to read the signs.”
Mastering sanding best practices for different grain types ensures optimal finish adhesion and appearance. Open grain requires less aggressive sanding because pronounced texture naturally hides minor imperfections. Closed grain demands meticulous sanding since every scratch shows through finish coats. Learning the benefits of finishing wood properly motivates the extra effort required for grain-appropriate techniques.
Choosing the right wood grain for your project
Matching grain characteristics to project requirements ensures both structural success and aesthetic satisfaction. Different furniture pieces and woodworking projects benefit from specific grain types based on functional demands and visual goals.
| Project Type | Recommended Grain | Reasoning |
|---|---|---|
| Dining Tables | Closed (maple, cherry) | Smooth surface for dining, easy cleaning |
| Coffee Tables | Open (oak, walnut) | Durable, character-rich, handles impacts |
| Cutting Boards | Closed (maple, beech) | Tight grain resists bacteria, easier sanitizing |
| Bookshelves | Either type works | Choose based on aesthetic preference |
| Decorative Panels | Open (ash, oak) | Pronounced grain creates visual interest |
| Painted Furniture | Closed (poplar, pine) | Smooth base for paint, less prep work |
| Outdoor Furniture | Open (white oak, teak) | Superior weather resistance, natural durability |
Grain direction and figure contribute significantly to both strength and workability. Boards with straight grain along their length provide maximum strength for structural components like table legs and chair frames. Figured grain (curly, quilted, or bird’s eye patterns) creates stunning visual effects but can be challenging to work because fibers run in multiple directions.
Consider these factors when matching grain to your specific task:
- Evaluate the primary function (structural support, display surface, utility item)
- Assess exposure to moisture, impacts, and wear patterns
- Determine if you want grain to be a focal point or subtle background element
- Consider your skill level with different grain types and finishing techniques
- Factor in budget, as figured and quarter sawn lumber costs significantly more
- Think about maintenance requirements over the project’s lifespan
Understanding the role of wood selection in DIY woodworking helps you make informed decisions before purchasing lumber. Grain type affects not just appearance but also how easily you can achieve professional results with your current skill set and tools. Starting with furniture grade wood appropriate to your project type and experience level sets you up for success.
Tips for working with wood grain
Reading and respecting grain direction throughout your build process separates amateur results from professional craftsmanship. Proper grain handling ensures best results, reduces errors, and improves visual appeal across every woodworking operation.
Follow these steps for optimal grain management:
- Inspect each board under good lighting before cutting, marking grain direction with a pencil arrow
- Arrange boards so grain patterns flow naturally across your assembled project
- Plan cuts to minimize tear-out by feeding wood so the blade cuts with the grain, not against it
- Use sharp blades and bits, as dull tools tear fibers regardless of grain direction
- Test joinery cuts on scrap pieces with similar grain orientation before cutting project pieces
- Sand progressively through grits, always moving with the grain direction
- Apply finish with the grain using long, smooth strokes that follow fiber direction
- Perform final inspection under raking light to reveal any areas where you worked against the grain
Tear-out occurs when cutting tools lift and break wood fibers instead of slicing cleanly through them. This happens most often when cutting against grain direction or using dull tools. Prevent tear-out by scoring cut lines with a sharp knife, which severs surface fibers before the saw blade reaches them. Back up crosscuts with scrap wood to support fibers at the exit point where tear-out typically occurs.
Snipe (deep gouges at board ends from planers and jointers) becomes more visible in figured or irregular grain. Minimize snipe by supporting boards fully as they enter and exit machines. Feed multiple boards through in succession so the machine maintains consistent pressure. When snipe does occur, cut affected ends off before final dimensioning.
Pro Tip: Always sand with the grain, never against. Cross-grain scratches cut across wood fibers, creating visible lines that show through every finish coat. Even fine-grit cross-grain scratches remain visible under stain because they absorb more color than surrounding wood. Sanding with the grain keeps scratches aligned with natural fiber direction, making them virtually invisible.
Before final assembly, examine each component under bright, angled light. This reveals grain direction, surface imperfections, and areas needing additional attention. Catching grain-related issues before glue-up saves hours of difficult repair work on assembled projects. These tips for woodworking beginners apply equally to experienced craftspeople working with unfamiliar wood species or grain patterns.
Next steps for woodworking success
You now understand how wood grain influences every aspect of your DIY projects, from material selection through final finishing. This knowledge transforms how you approach woodworking, helping you anticipate challenges and achieve professional results more consistently.

Applying grain knowledge becomes easier with detailed project plans that guide you through material selection, preparation, and assembly. Explore free woodworking plans designed for various skill levels, each explaining which wood types and grain characteristics work best for that specific project. These plans help you practice grain-reading skills while building functional furniture and décor.
Beyond better project outcomes, woodworking offers significant personal benefits. Discover the benefits of DIY woodworking including cost savings, stress reduction, and the satisfaction of creating heirloom pieces with your own hands. Understanding grain characteristics amplifies these benefits by reducing frustration and increasing your success rate.
Expand your woodworking vocabulary with comprehensive furniture making terminology that helps you communicate with other woodworkers, understand lumber yard specifications, and follow advanced techniques. Grain-related terms form the foundation of this specialized language, connecting you to centuries of woodworking tradition and knowledge.
Frequently asked questions
Why does wood grain affect stain color so much?
Open grain absorbs stain deeply while closed grain may blotch, creating color variations based on how pores accept pigment. This absorption difference explains why identical stain produces dramatically different results on oak versus maple.
Can I change the look of the grain through sanding or finishing?
You can highlight or smooth grain using sanding and finishing techniques, but the inherent pattern and texture remain unchanged. Grain raising from water-based finishes can be managed by sanding between coats, though this enhances rather than alters the existing grain structure.
What tools help read wood grain direction?
A bright light or wetting the surface with mineral spirits makes grain direction more visible for better prepping and sanding. The moisture temporarily darkens wood, revealing fiber direction and figure patterns that guide your cutting and finishing approach.
Which grain type is best for tabletops?
Closed grain offers a smoother feel making maple ideal for dining tables, but open grain options like oak create robust surfaces if filled properly. Your choice depends on whether you prioritize smoothness or character in your finished piece.
Recommended
- Woodworking Trends 2026: Innovations Shaping DIY
- Real Woodwork Plans – Free Woodworking Plans
- Why select specific wood types: A 2026 beginner’s guide
- Wood Types Explained: Choosing for DIY Projects

“DIY woodworking enthusiast who started with zero experience and a YouTube tutorial.
I build simple, practical projects for my home and share free plans
so other beginners can skip the guesswork.If I can build it, you can too.”